Install the plugin
Learn how to install and configure the plugin.
Follow these steps to install and configure Unzer plugin for Magneto 2 ecommerce platform.
Before you begin
Before installing Magento 2, make sure you meet the following requirements:
- Magento 2 requirements
- Basic integration requirements from Unzer
- PHP version 8.1 or later
- Magento 2 version 2.4.5 or later
- Unzer public key and private key
- The currently supported PHP versions can be viewed in the README.md on GitHub and Packagist.
- Only the default Magento 2 checkout is supported and Magento 2 Multi-shipping Checkout is not supported.
- Unzer always supports the latest three versions for Magento 2.
- The Magento 2 version 2.4.8 is currently in discussion and will be available soon.
Third-party plugins and templates can affect the usability of our plugin and may even cause it to stop working. So, before using or updating them and each update, check to if there are any changes on the test system.
Migration from an existing plugin
For users who already use the existing plugin, it is necessary for a transitional period to include both store plugins in parallel in the store and to leave the old one configured and active. The new plugin cannot reference old orders/transactions.
Therefore, you should preferably activate the required payment types in the new plugin and deactivate the corresponding payment types in the old plugin. The old plugin must continue to be configured and activated for the old orders placed via it in order to continue to ensure the payment processing of existing orders (for example, for a return or refund).
Step 1: Install the plugin via Composer
- Install the Plugin using Composer.
composer require unzerdev/magento2 - Once Composer has installed the dependencies and the plugin, activate it using the following command:
php bin/magento module:enable Unzer_PAPI --clear-static-content - Run the
setup:upgradecommand through the console, to import the plugin schema into your database:php bin/magento setup:upgrade - The following commands clear the cache and execute the final steps for plugin installation— the generation of dependency injection and deployment of static files for the front end.
php bin/magento cache:flushphp bin/magento setup:di:compilephp bin/magento setup:static-content:deploy
The installation is now complete, and you can configure the plugin in the admin back end.
Step 2: Configure your plugin environment
In the store backend, go to Stores > Configuration.
- Select Sales > Payment Methods.
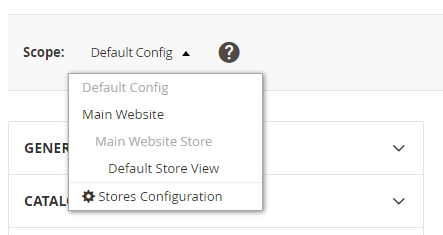
- To configure the store view, select the level that you want to configure in the top left corner. Normally, you can configure settings for the module in the Default Config. This means that the key pair configured here is used for all store views.
Alternatively, you can configure different key pairs for each store view.

General Settings
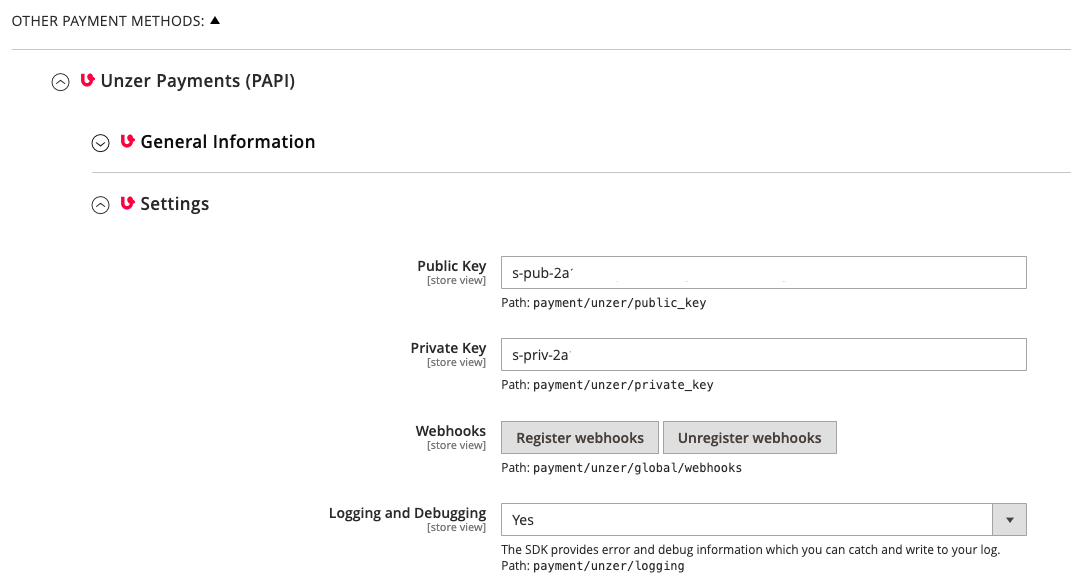
Select Unzer Merchant Gateway (MGW) and select Settings to update the general setup details like your key pair.

Available parameters
| Field/Button | Description | Tooltip |
|---|---|---|
| Public Key / Private Key | Enter your public key / private key here | Get your own key pair To test payment transactions before going live, you can use the sandbox key pair you can request from our support team. [Get test API keys.](/get-started/get-test-account/#Step 2: Get test API keys) Use the payment test data available here: Test data |
| Register webhooks | To activate the webhooks, click Register webhooks. | Use webhooks to receive updates on the payments’ status. This is important for payment methods for which the actual receipt of payment is scheduled for a later time (for example, invoice payment methods). For more information about webhooks, go to Webhooks |
| Logging and Debugging | This option can be activated to log debug information about the module | When Logging and Debugging is enabled, all queries to the payment interface and their responses are logged to var/log/unzer_debug.log.This option is only recommended for troubleshooting and should be disabled in Live mode to save storage. |
Save the configuration before you register the webhook events so that the correct key pair is used.
