Set up your payment methods
Set up the payment methods that you want to offer to your customers.
Before you begin
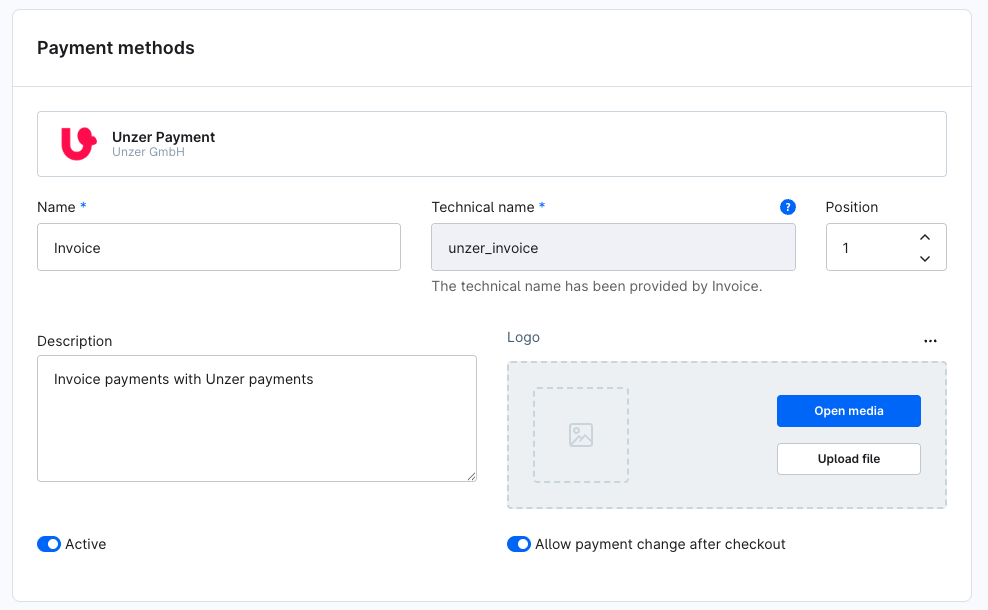
Step 1: Configure payment methods
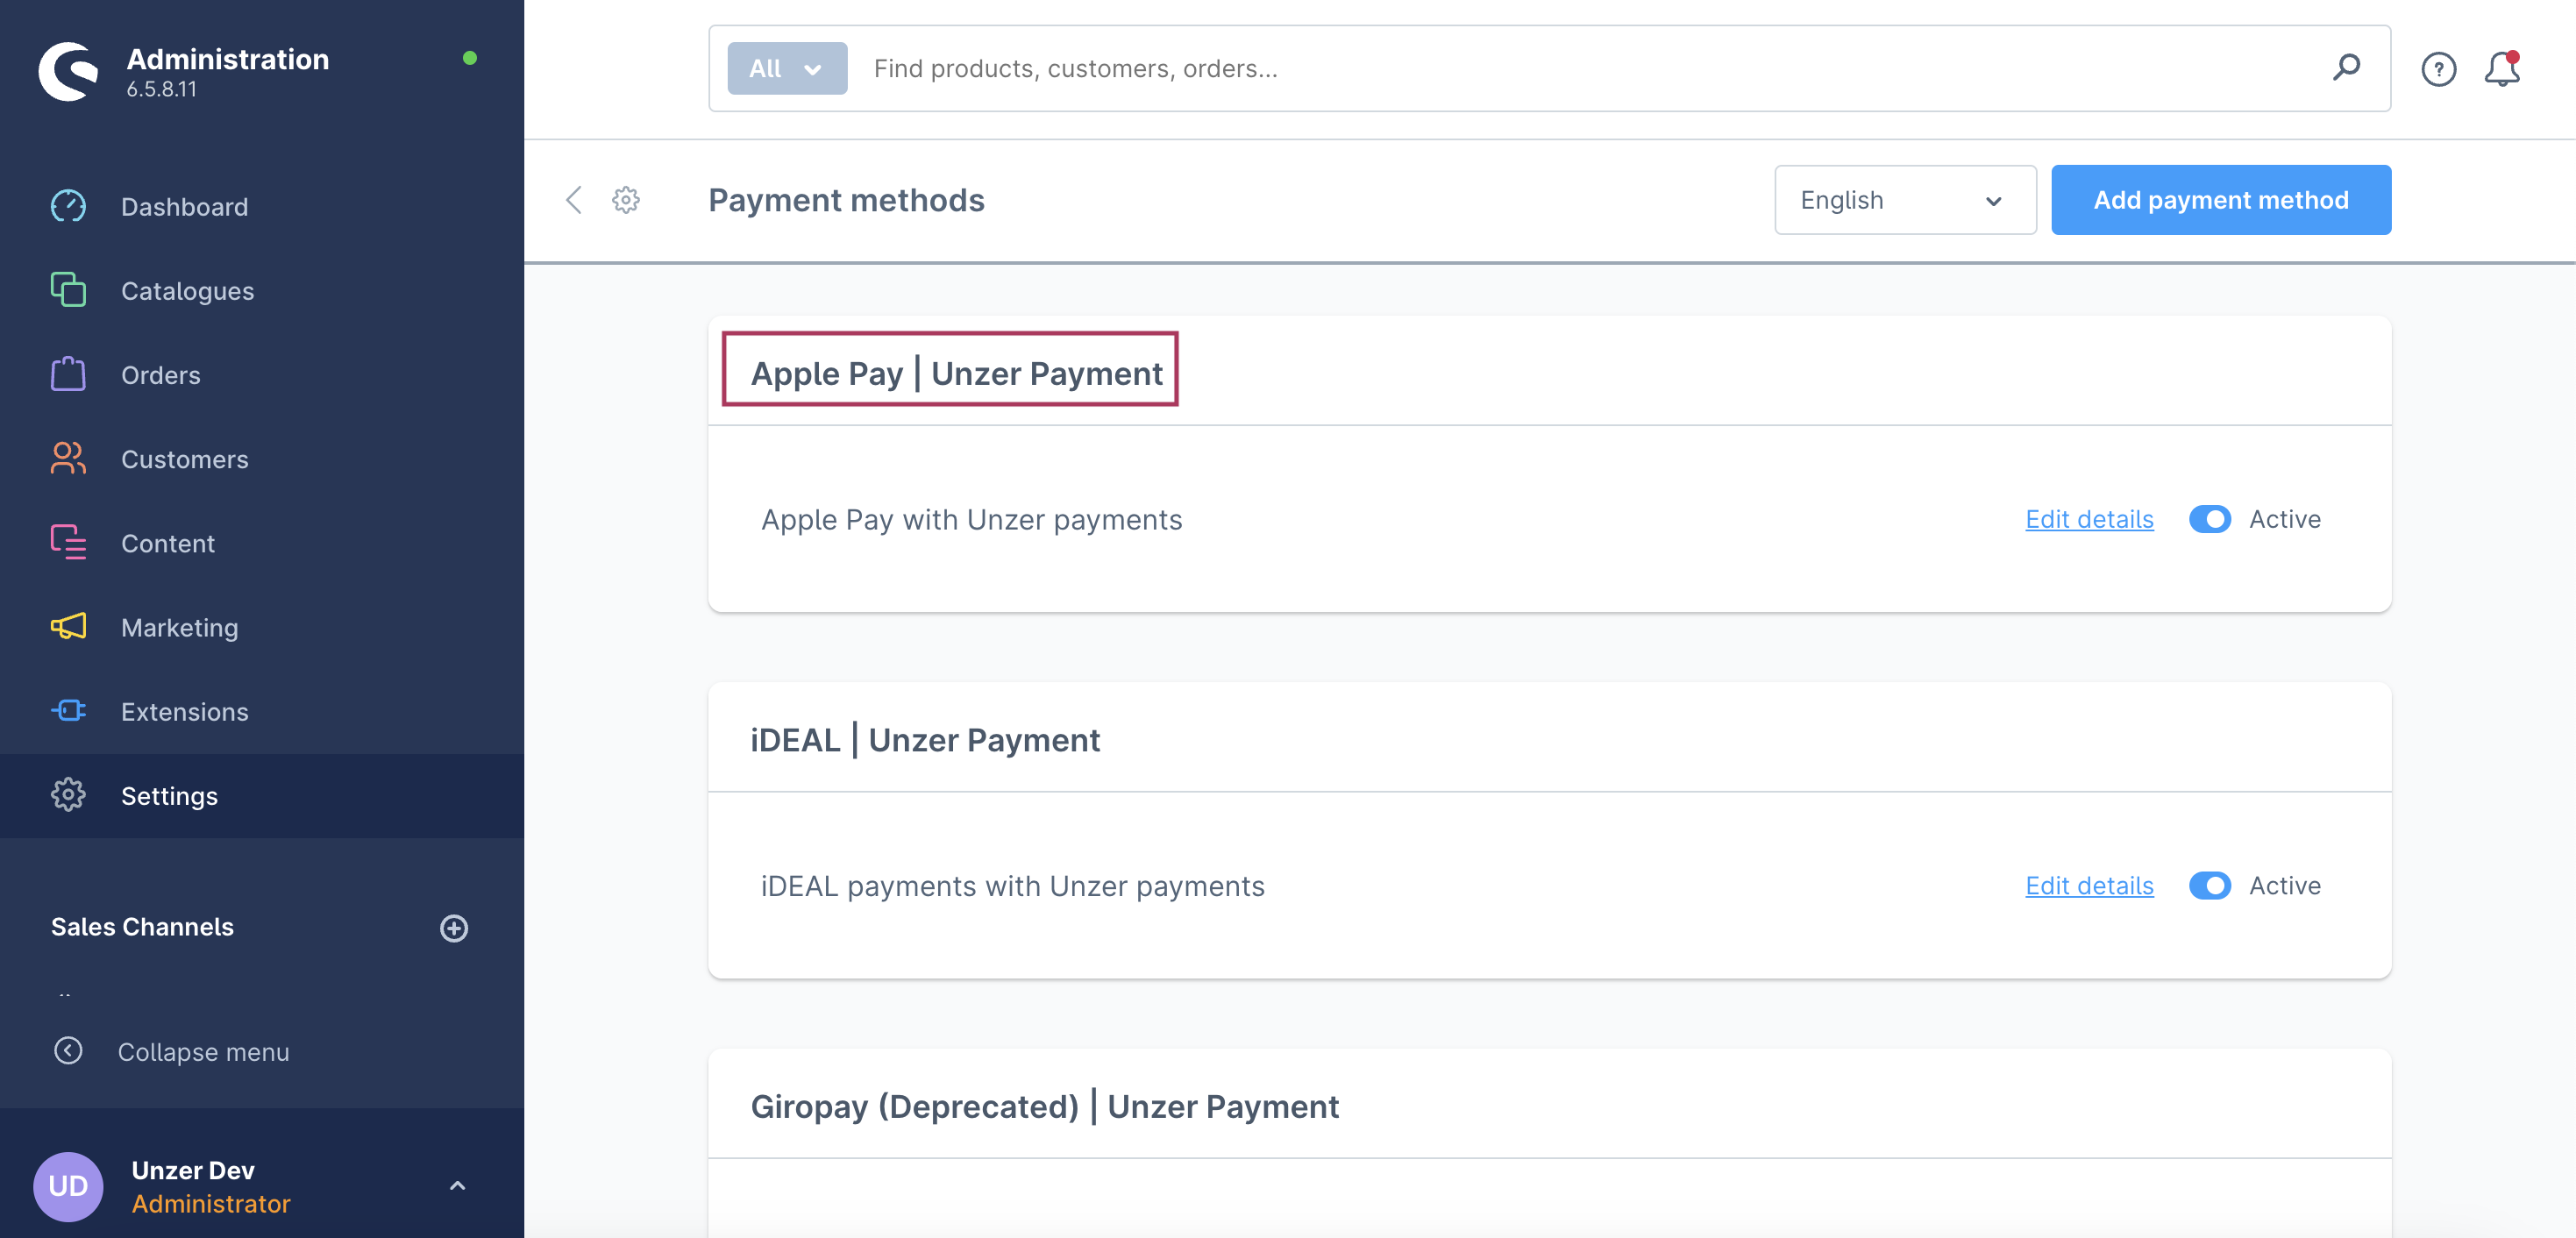
Log in with your admin credentials and go to Settings > Shop > Payment.
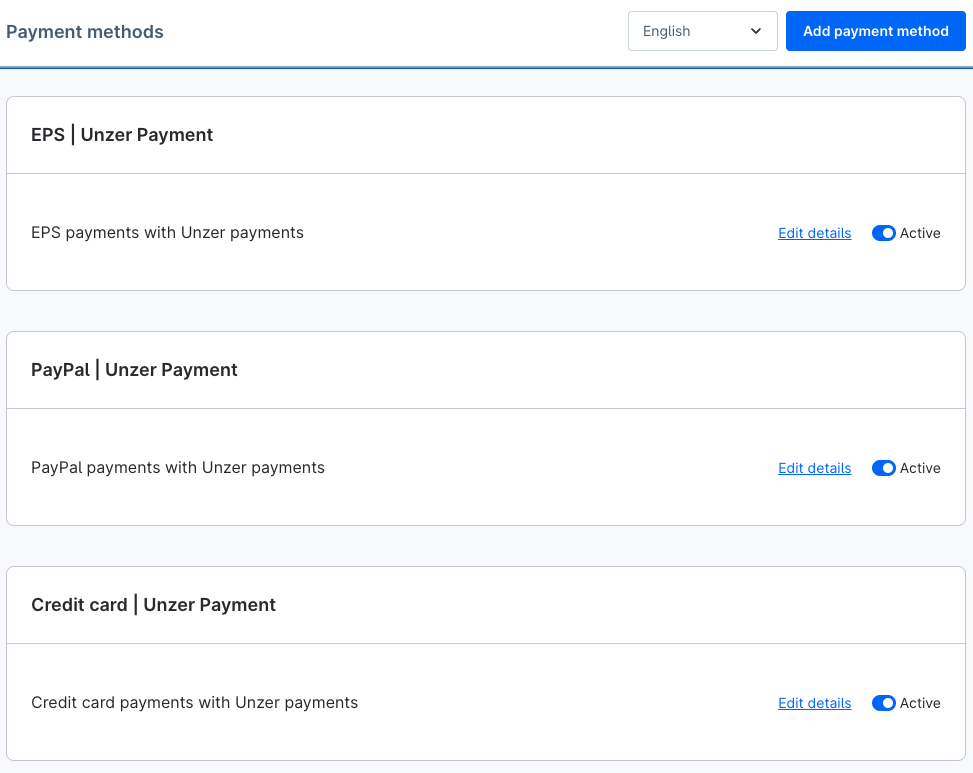
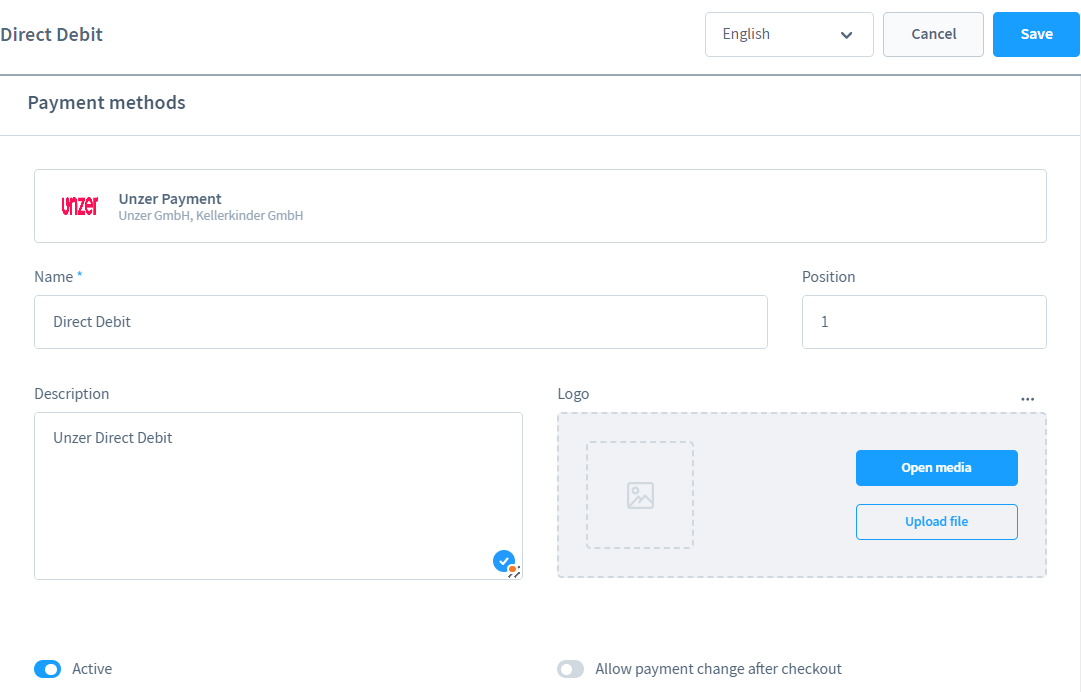
Select the payment type you want to update and select Edit.
Edit the payment type according to your requirements as described in the table below.
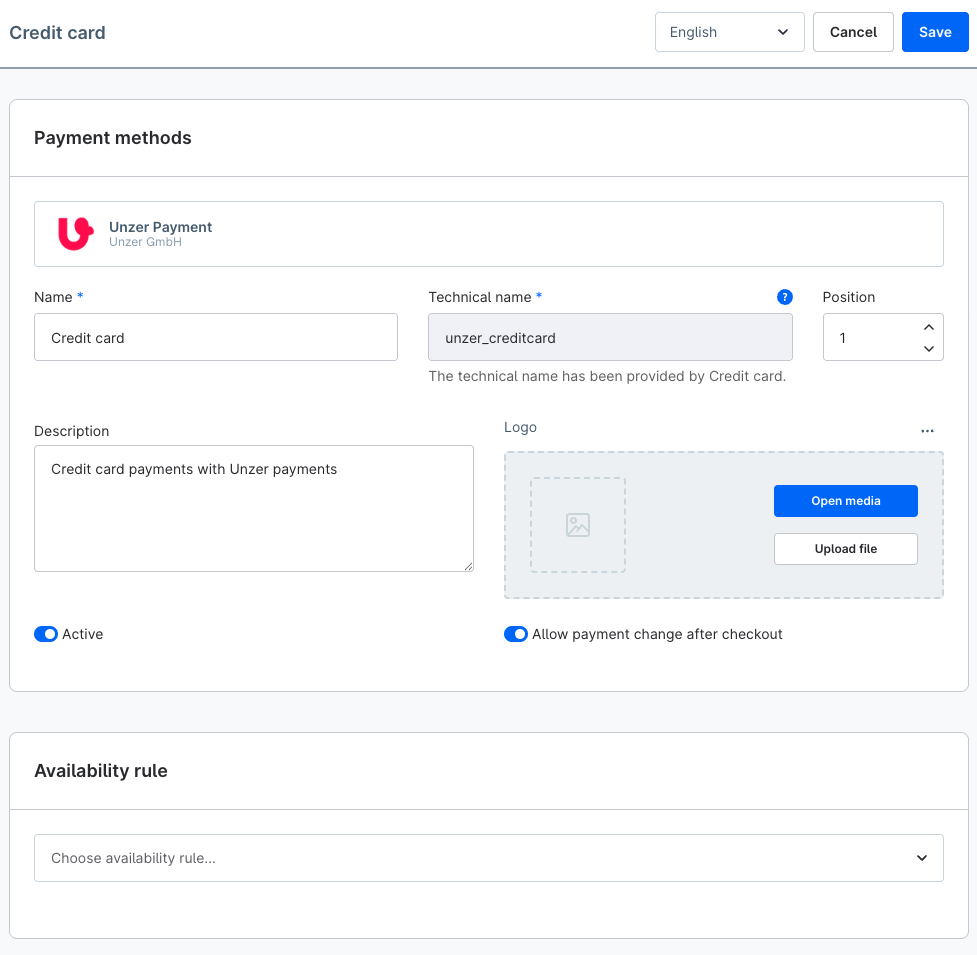
| Field name | Description |
|---|---|
| Name | You can change the payment type name displayed in the storefront |
| Position | Determine the display order for the end customer in shop frontend |
| Description | Add the additional description text, if required. |
| Logo | Add a logo for the payment method, if required. |
| Availability rule | Select the Availability Rule (Rule builder) to determine when the payment type should be available to the end customer (country restrictions, customer groups, etc.) |
| Active | Activate the payment method to be visible in the store front end. |
| Allow payment change after checkout? | Select this option if the payment type must still be selectable for the end buyer after a payment cancellation or rejection. |
- Select Save to save your settings.
Step 2: Set up your payment methods for sales channel
Go to the Sales channel configuration for which you want to activate the payment methods.
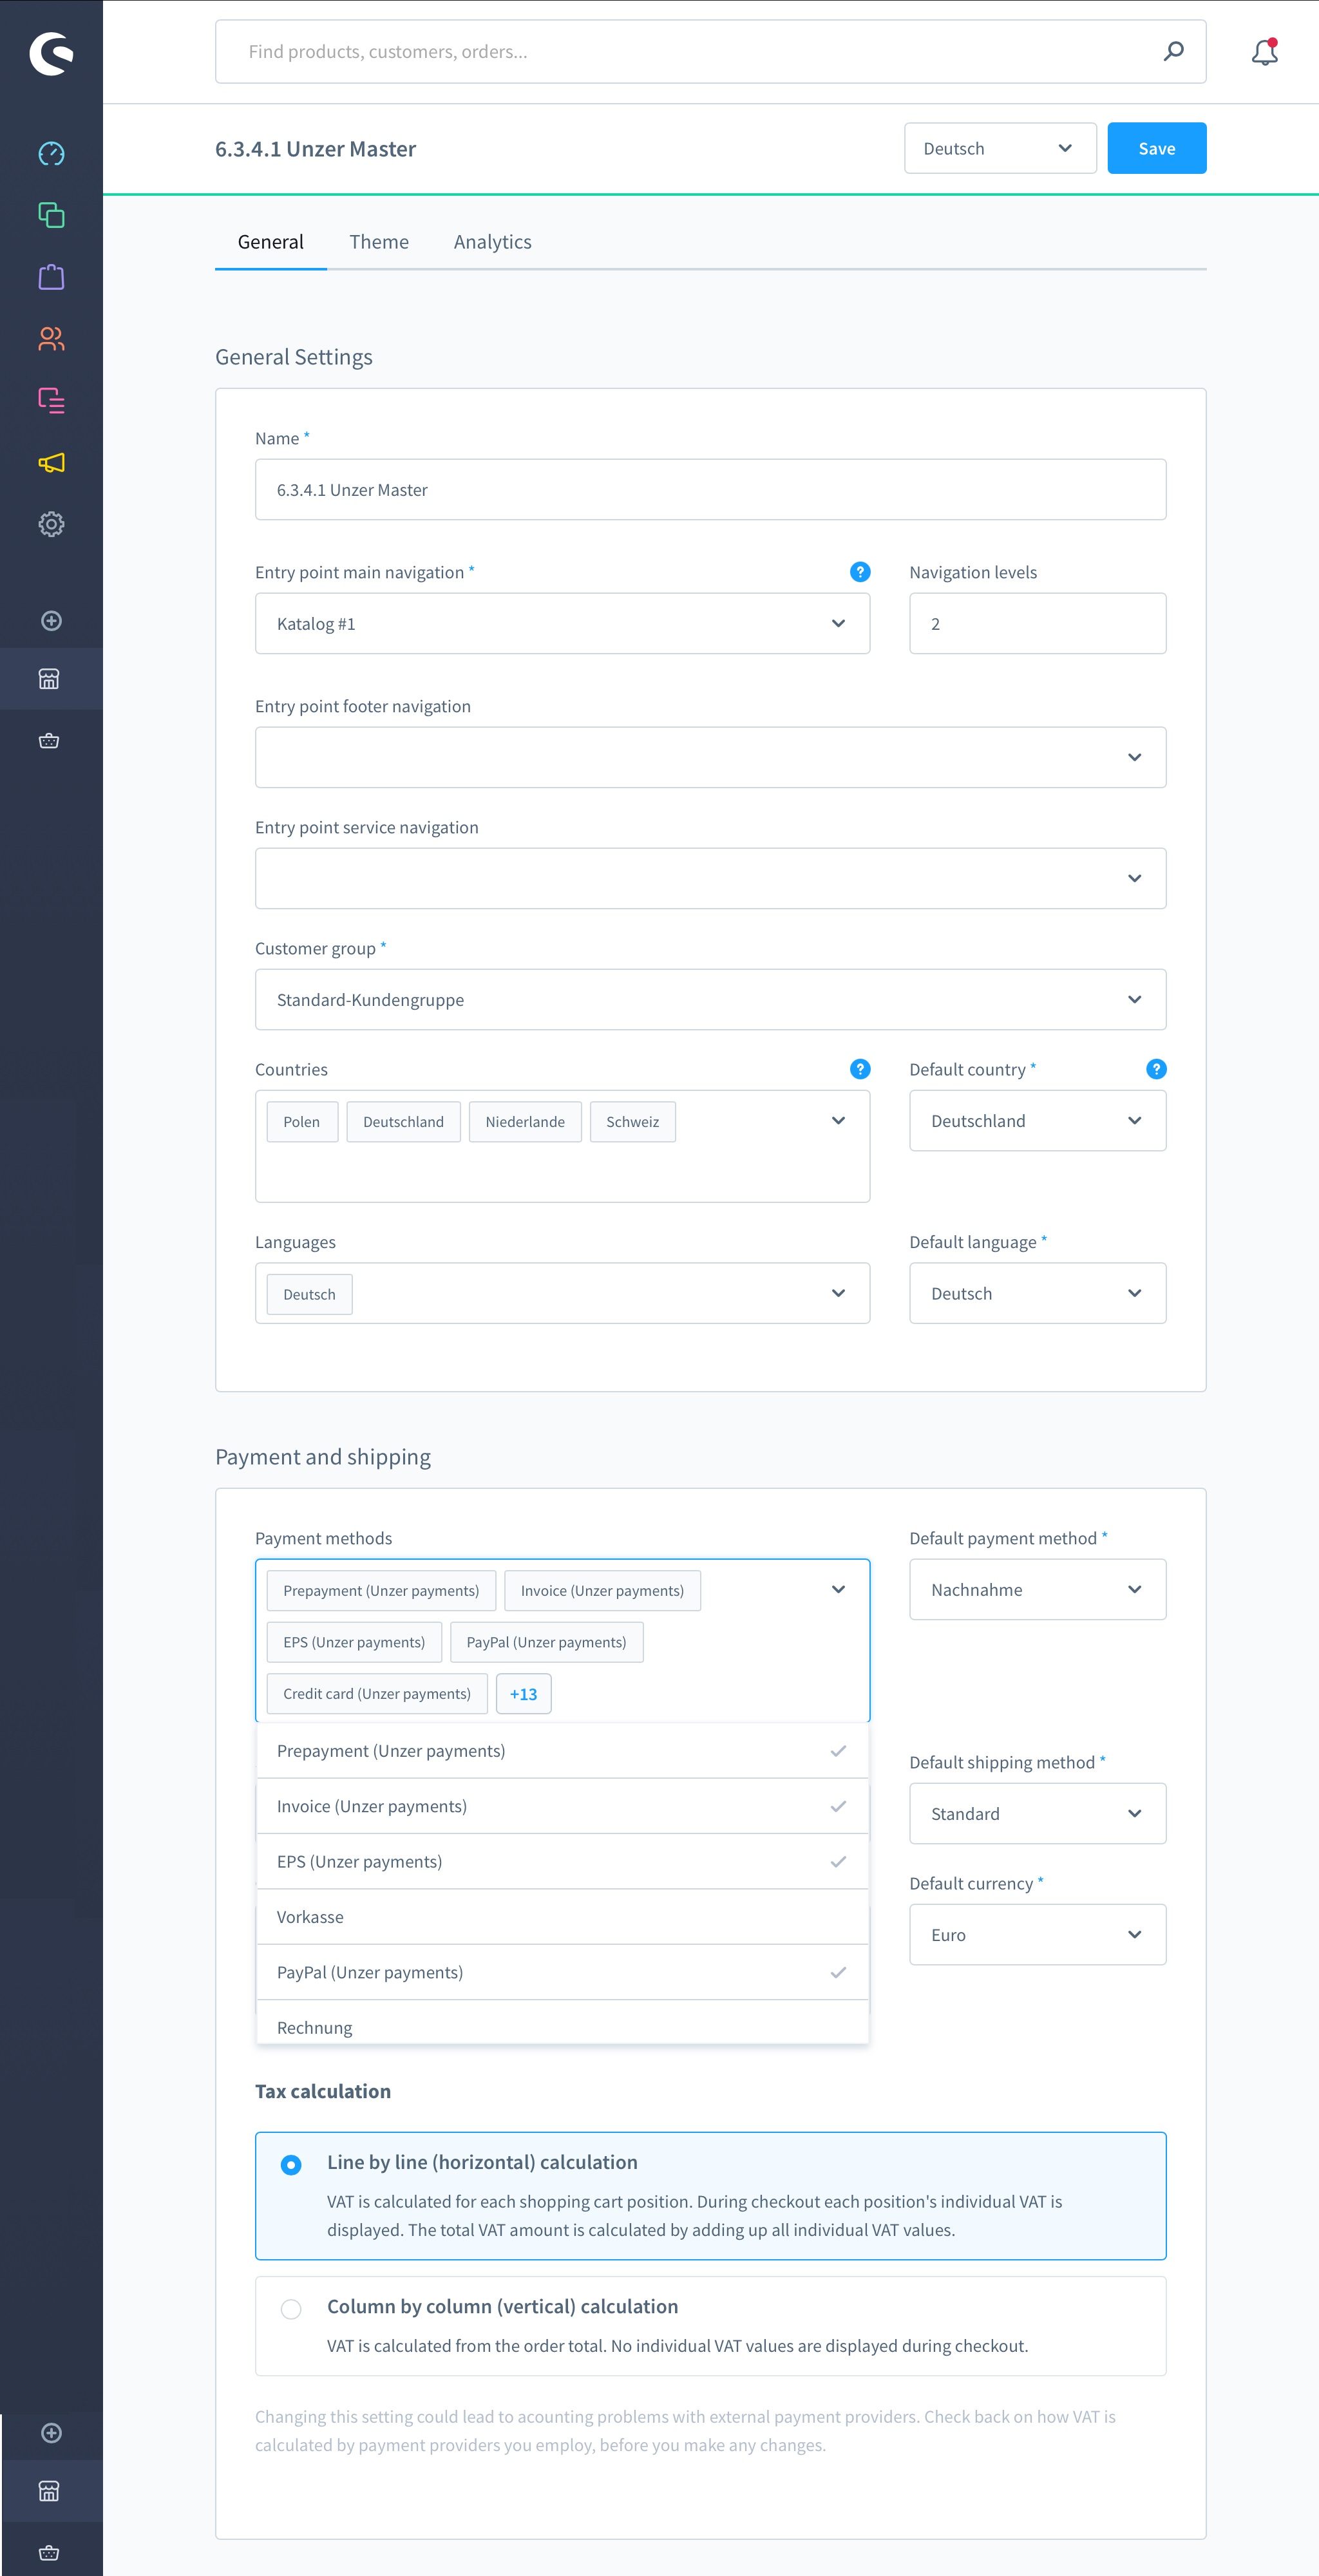
Select the payment methods that are available for you.
 info
info
You can only use the payment methods that are specified in your contract with Unzer. Even if you can edit the other payment methods, they will not be reflected in Unzer Insights.Select your default payment type.
Select Save.
You must clear the caches each time you update the configuration. See also Step 3: Configure your plugin environment
Specific payment method requirements
Some payment methods have restrictions based on currency and country. You can easily set up these restrictions using the Shopware Rulebuilder and then apply them to your Shopware Checkout flow. See details for each payment method
Set up Apple Pay payment method
Before you begin integrating Apple Pay payment method, please read the Apple Pay prerequisites for integration.
- Go to Settings > Extensions > Unzer Payments and select the Booking mode for Apple Pay.
- Select Save.
- Go to Settings > Extensions > Payment methods and select Apple Pay.
- Select Edit details.
- Specify the various details for the payment method.
- Select Active and then Save.
Set up Unzer Installment payment method
- For Unzer Installment payment method, ensure that only end customers with an invoice address from Germany, Austria, or Switzerland can use this payment method.
- You do not require a unique key pair for each customer type and currency combination, for example a separate key pair for each combination B2C (EUR), B2C (CHF).
- If no keys are saved for this payment method, the main key pair will be used.
- When you insert the Public Key, the field for Private Key will be visible.
- Currently, only B2C customer type is supported.
- Currently only Euro (EUR) and Swiss Franc (CHF) currencies are supported.
- Ensure that the payment method can only be used for the minimum and maximum amounts contractually agreed with Unzer.
- You can view the transactions in Unzer Insights.
Set up payment method
Go to Settings > Extensions > Unzer Payment and expand API keys for additional payment methods and scroll to Installment section.
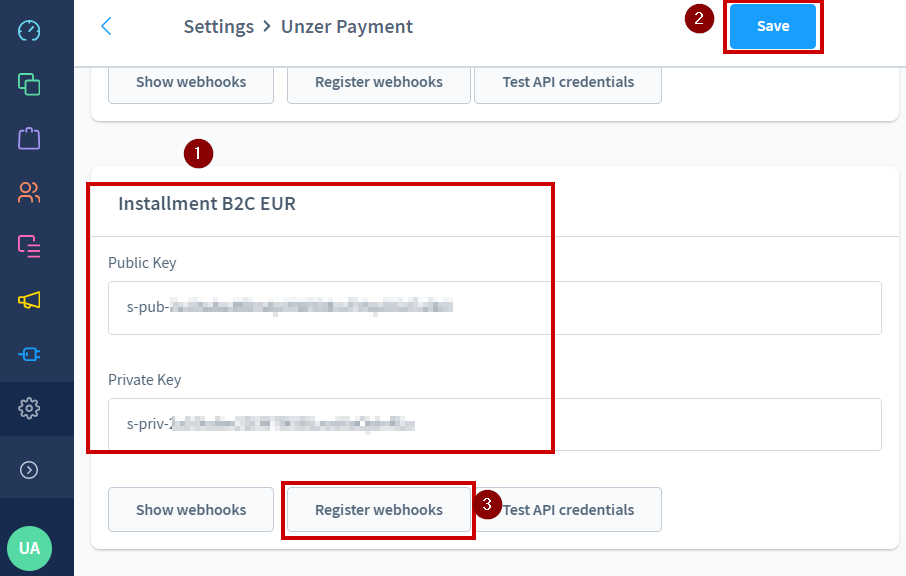
| Field name | Description |
|---|---|
| Public Key | Enter the public key that is available in Unzer Insights. |
| Private Key | Enter the private key that is available in Unzer Insights. |
| Show webhooks | After entering the key pairs, you can check all webhooks that are registered with the entered key pairs |
| Register webhooks | Register webhooks with entered key pairs |
| Test API Credentials | Test the validity of the entered key pairs |
Select Save.
Select the domain and then select Register webhooks > Save.
Repeat the same steps to add other combinations according to your business case.
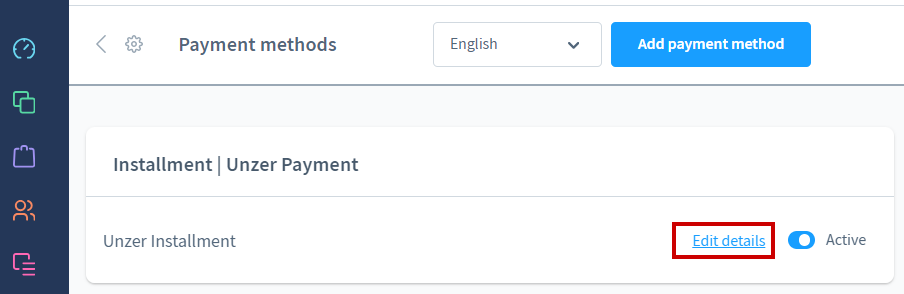
In the shop back end, go to Settings > Payment methods > Installment | Unzer Payment.
Click Edit details.
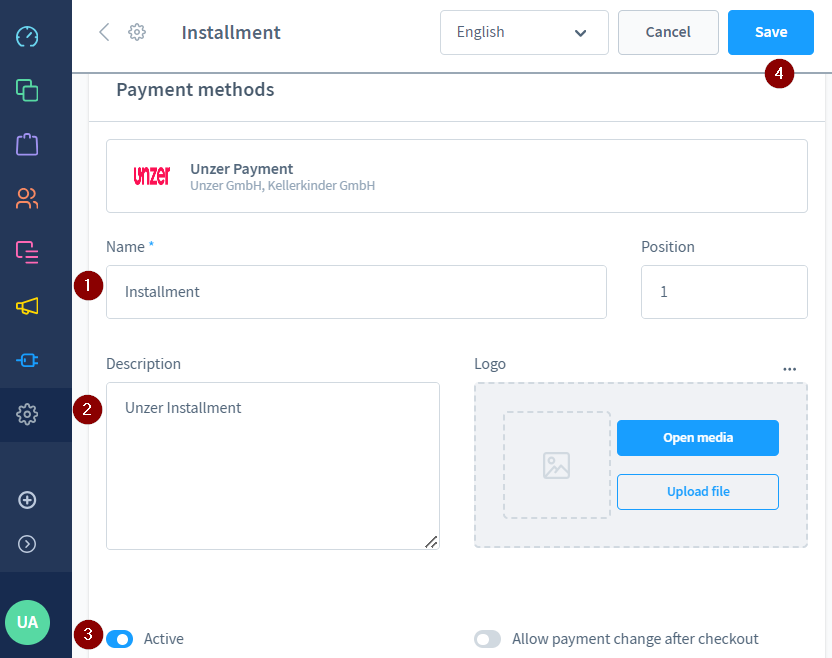
In the payment method details window, specify the name for the payment method as you want to display in the front end.
Select Active and then Save.
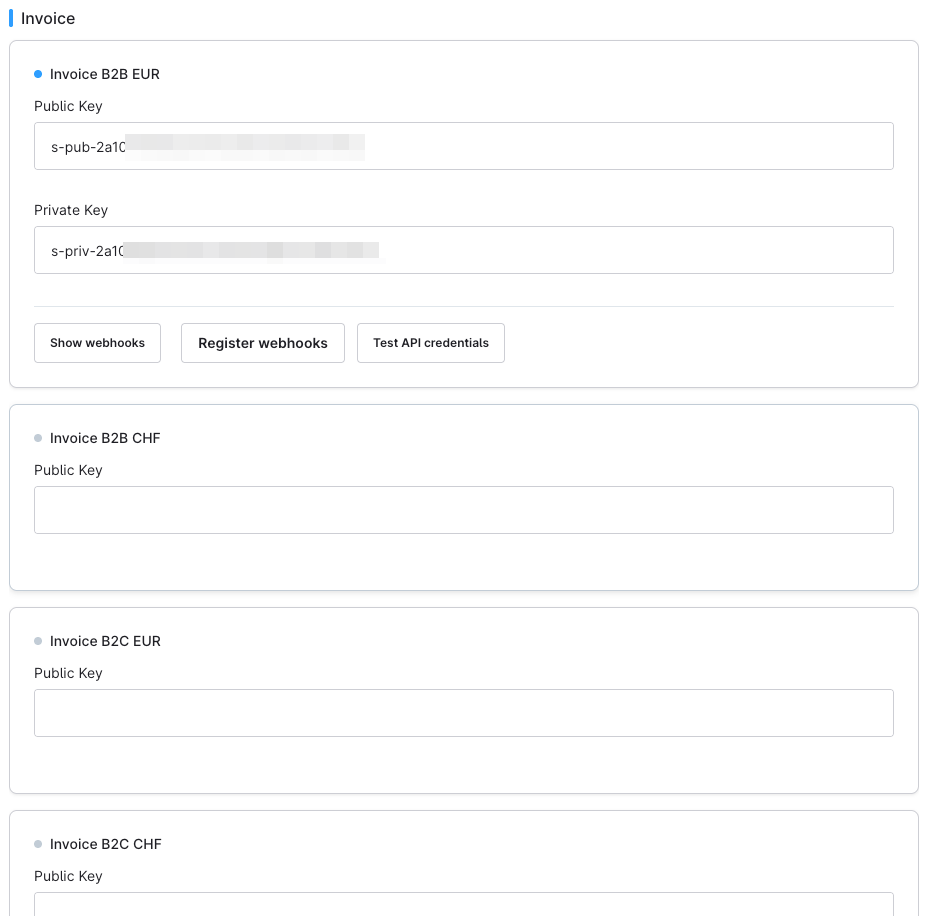
Set up Unzer Invoice payment method
- For Unzer Invoice payment method, ensure that only end customers with an invoice address from Germany, Austria, or Switzerland can use this payment method.
- You do not require a unique key pair for each customer type and currency combination, for example a separate key pair for each combination B2C (EUR), B2C (CHF).
- If no keys are saved for this payment method, the main key pair will be used.
- When you insert the Public Key, the field for Private Key will be visible.
- B2C and B2B customer types are supported.
- Currently only Euro (EUR) and Swiss Franc (CHF) currencies are supported.
- Ensure that the payment method can only be used for the minimum and maximum amounts contractually agreed with Unzer.
- You can view the transactions in Unzer Insights.
Set up payment method
Go to Settings > Extensions > Unzer Payment and expand API keys for additional payment methods and scroll to Invoice section.
| Field name | Description |
|---|---|
| Public Key | Enter the public key that is available in Unzer Insights. |
| Private Key | Enter the private key that is available in Unzer Insights. |
| Show webhooks | After entering the key pairs, you can check all webhooks that are registered with the entered key pairs |
| Register webhooks | Register webhooks with entered key pairs |
| Test API Credentials | Test the validity of the entered key pairs |
Select Save.
Select the domain and then select Register webhooks > Save.
Repeat the same steps to add other combinations according to your business case.
In the shop back end, go to Settings > Payment methods > Invoice | Unzer Payment.
Click Edit details.
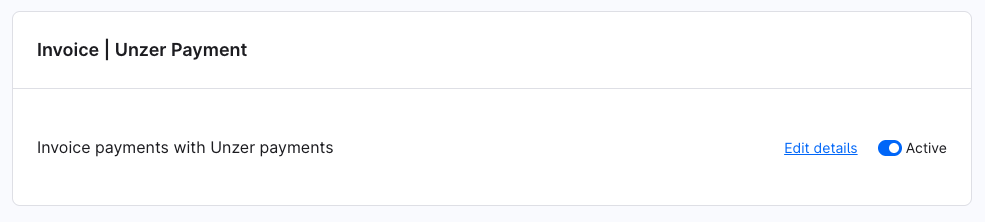
In the payment method details window, specify the name for the payment method as you want to display in the front end.
Select Active and then Save.
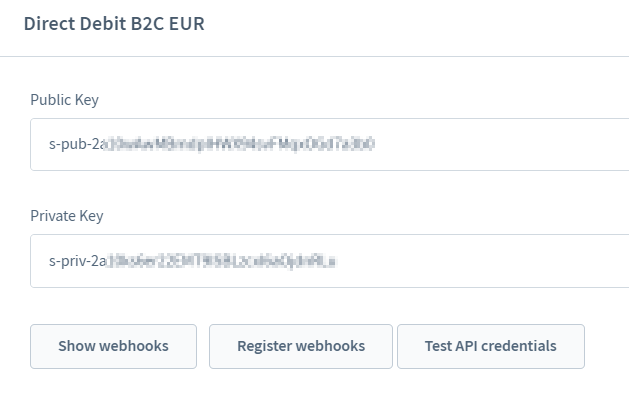
Set up Unzer Direct Debit payment method
Set up Unzer Direct Debit payment method- For Unzer Direct Debit, ensure that only end customers with an invoice address from Germany and Austria can use this payment method.
- You do not require a unique key pair for this payment method, for example, a separate key pair for each combination B2C (EUR).
- If no keys are saved for this payment method, the main key pair will be used.
- When you insert the Public Key, the field for Private Key will be visible.
- Only B2C customer type is supported.
- Only Euro (EUR) is supported.
- Ensure that the payment method can only be used for the minimum and maximum amounts contractually agreed with Unzer.
- You can view the transactions in Unzer Insights.
Set up the payment method
Go to Settings > Extensions > Unzer Payment and expand API keys for additional payment methods and scroll to Direct Debit section.
| Field name | Description |
|---|---|
| Public Key | Enter the public key that is available in Unzer Insights. |
| Private Key | Enter the private key that is available in Unzer Insights. |
| Show Webhooks | After entering the key pairs, you can check all webhooks that are registered with the entered key pairs |
| Register Webhooks | Register webhooks with entered key pairs |
| Test API Credentials | Test the validity of the entered key pairs |
Select Save.
Select the domain and then select Register Webhooks > Save.
Repeat the same steps to add other combinations according to your business case.
In the shop back end, go to Settings > Payment methods > Direct Debit | Unzer Payment.
Click Edit details.
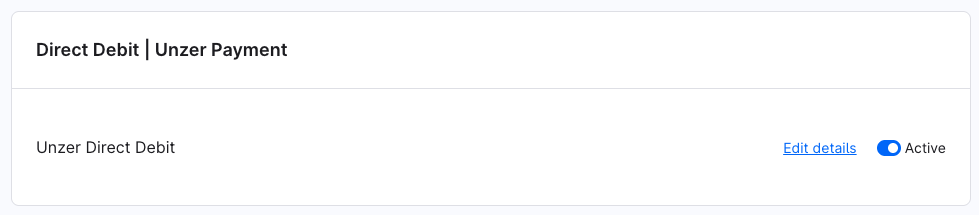
In the payment method details window, specify the name for the payment method as you want to display in the front end.
Select Active and then Save.
Set up Google Pay payment method
Go to Settings > Extensions > Unzer Payment and go to the Google Pay setup details.

Specify the details for the fields and click Save.
To learn more about the Google Pay integration, go to Google Pay: Overview.
You must also set up the gatewayMerchantId for Google Pay. Go to Google Pay integration for more details.
Set up one-click payments for cards, PayPal, and SEPA payment methods
You can set up instant one-click payments for card, PayPal, and SEPA payments for registered customers. The customer can choose to save the payment method for the next purchase. They can also log in to the customer back end and delete them if they want to delete these tokens later.
Supported payments: Credit cards, PayPal, and SEPA
When a registered customer chooses any of these payment methods, a checkbox for saving the payment methods is displayed in the checkout page.
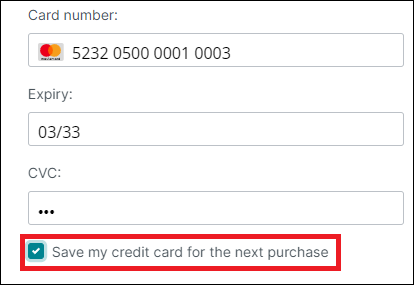
If the customer chooses the option to save credentials for the payment then the token is saved for the next purchases.
For example, for credit cards
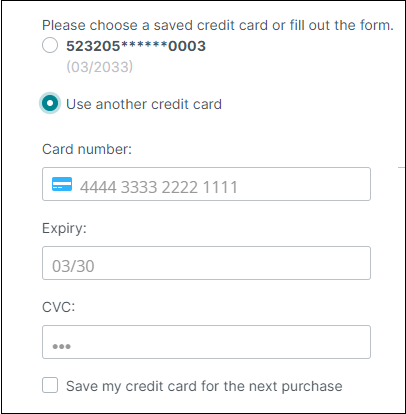
In the next purchase, the customer can choose to pay with saved card or add a new card:
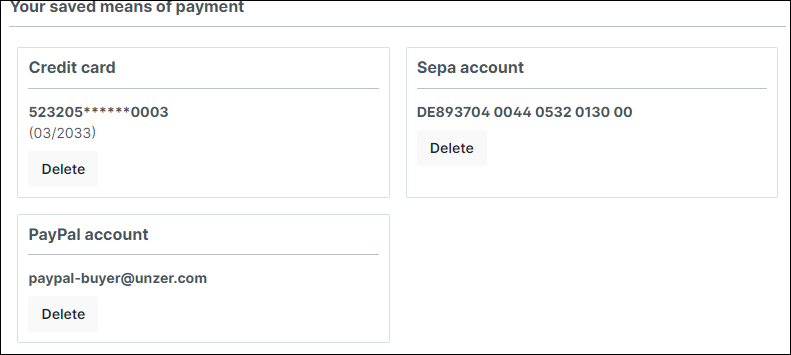
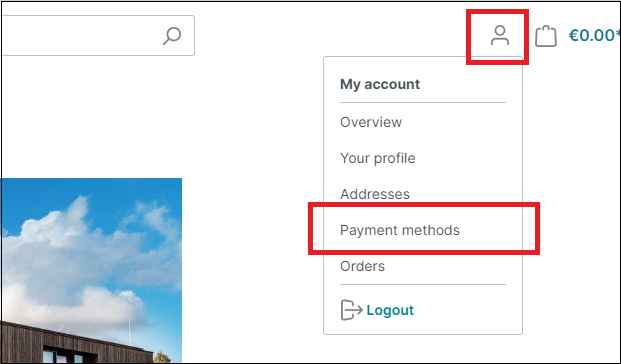
To view and delete the saved payment methods,
The customer can log in to their account and go to Overview.
Scroll down to Your saved means of payment section to view or delete the saved details.