Set up your payment methods
Set up the payment methods that you want to offer to your customers.
Before you begin
Step 1: Configure payment methods
- Sign in with your admin credentials and go to Configuration > Payment methods.
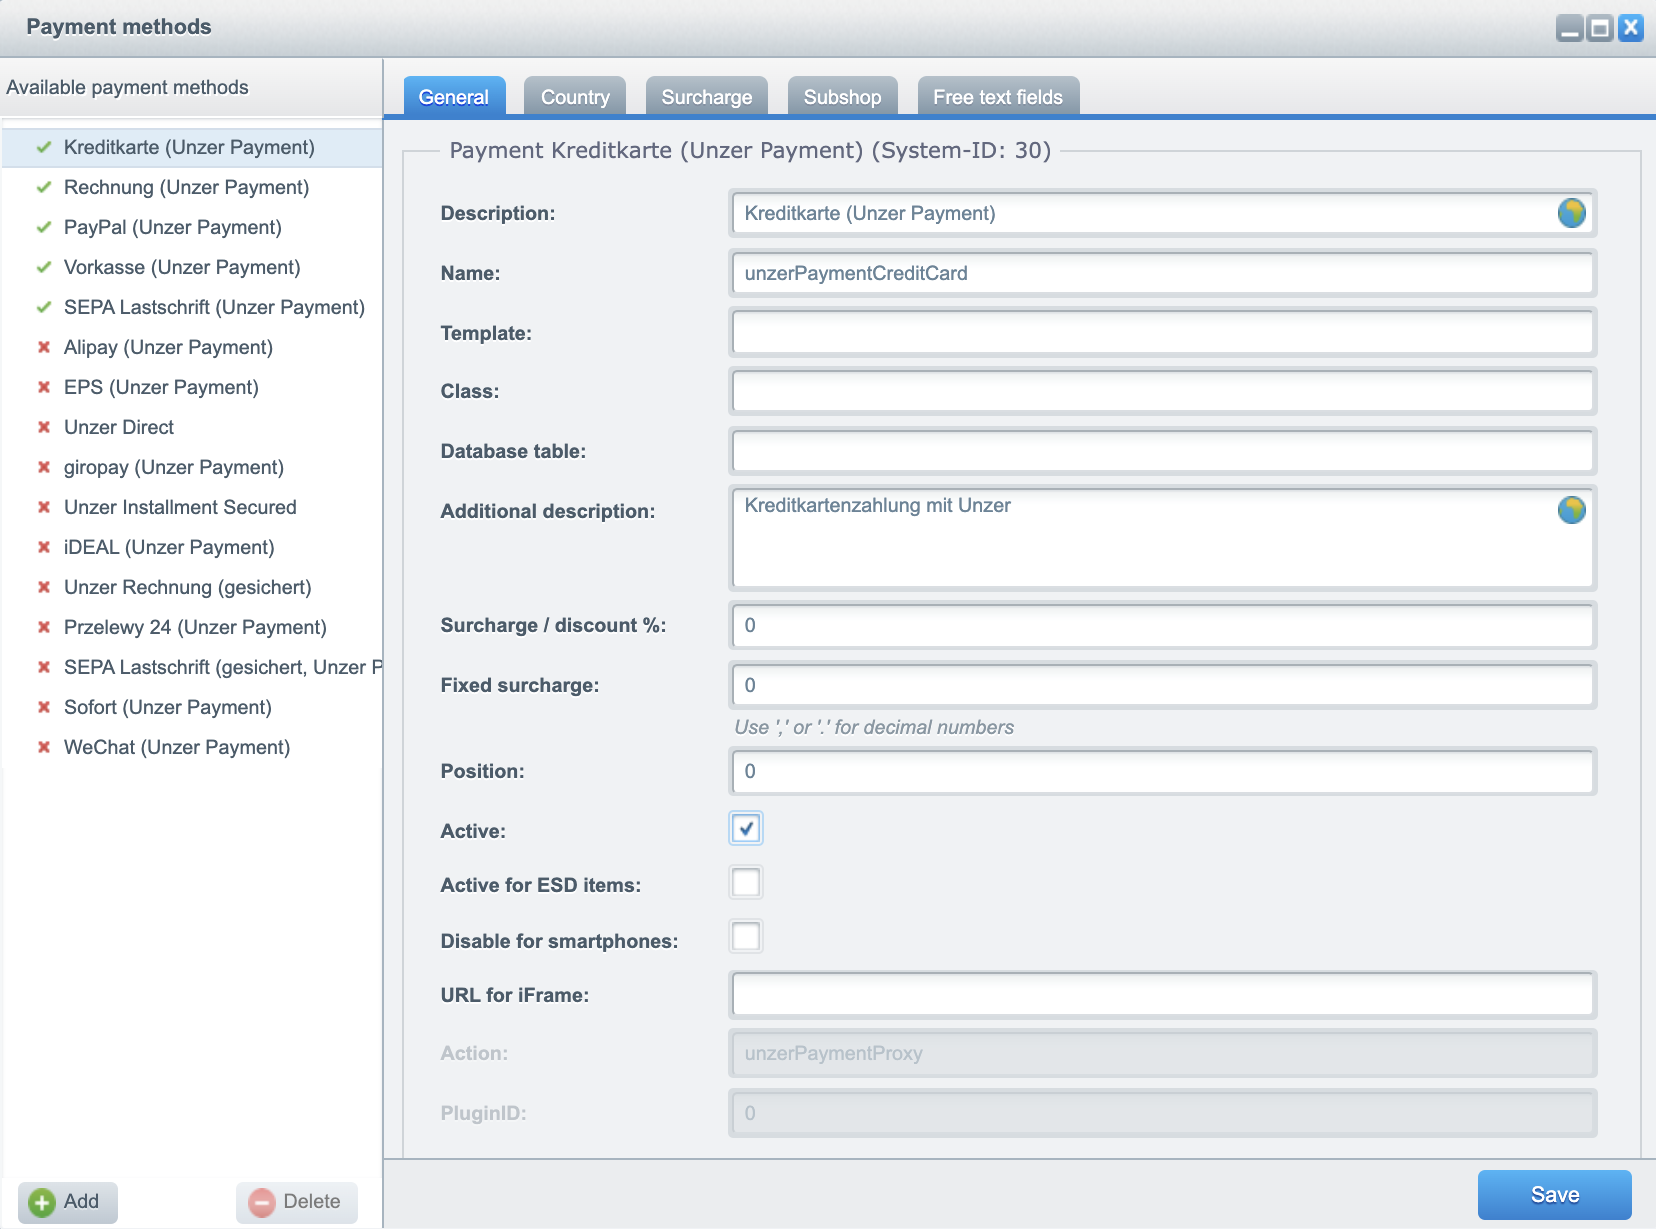
- Select the payment method that you want to update, for example, Kreditkarte (Unzer Payment).
- Edit the payment according to your requirements as described in the following table.
| Field | Description |
|---|---|
| Description | You can change the payment method name displayed in the storefront |
| Name | Do not change. The plugin uses internally this as an identifier. |
| Template | Do not change. The plugin provides own templates for each payment methods. |
| Class | Do not change. The plugin has a base class and not for each payment method |
| Database table | Do not change. The plugin doesn’t use single tables for each payment method. |
| Surcharge / Discounts % | Specify the discount percentage. Note that in some countries, using discounts or surcharges is forbidden by law. |
| Fixed surcharge | Specify the fixed surcharge. Note that in some countries, using discounts or surcharges is forbidden by law. |
| Position | Specify the order for displaying the payment method order |
| Active | Select to activate the payment method |
| Active for ESD items | Select to activate the payment method for ESD products |
| Disable for smartphone | Select to disable the payment method for smartphone users |
| URL for iFrame | Do not change. The plugin only uses for credit card and debit card own integrated iFrame solutions |
| Action | Do not change. The plugin has a common action for all payment methods build in. |
| PluginID | Do not change. This is an internal identifier. |
- Click Save to save your settings.
- (Optional) Click Country to select the countries you want to configure the payment method.
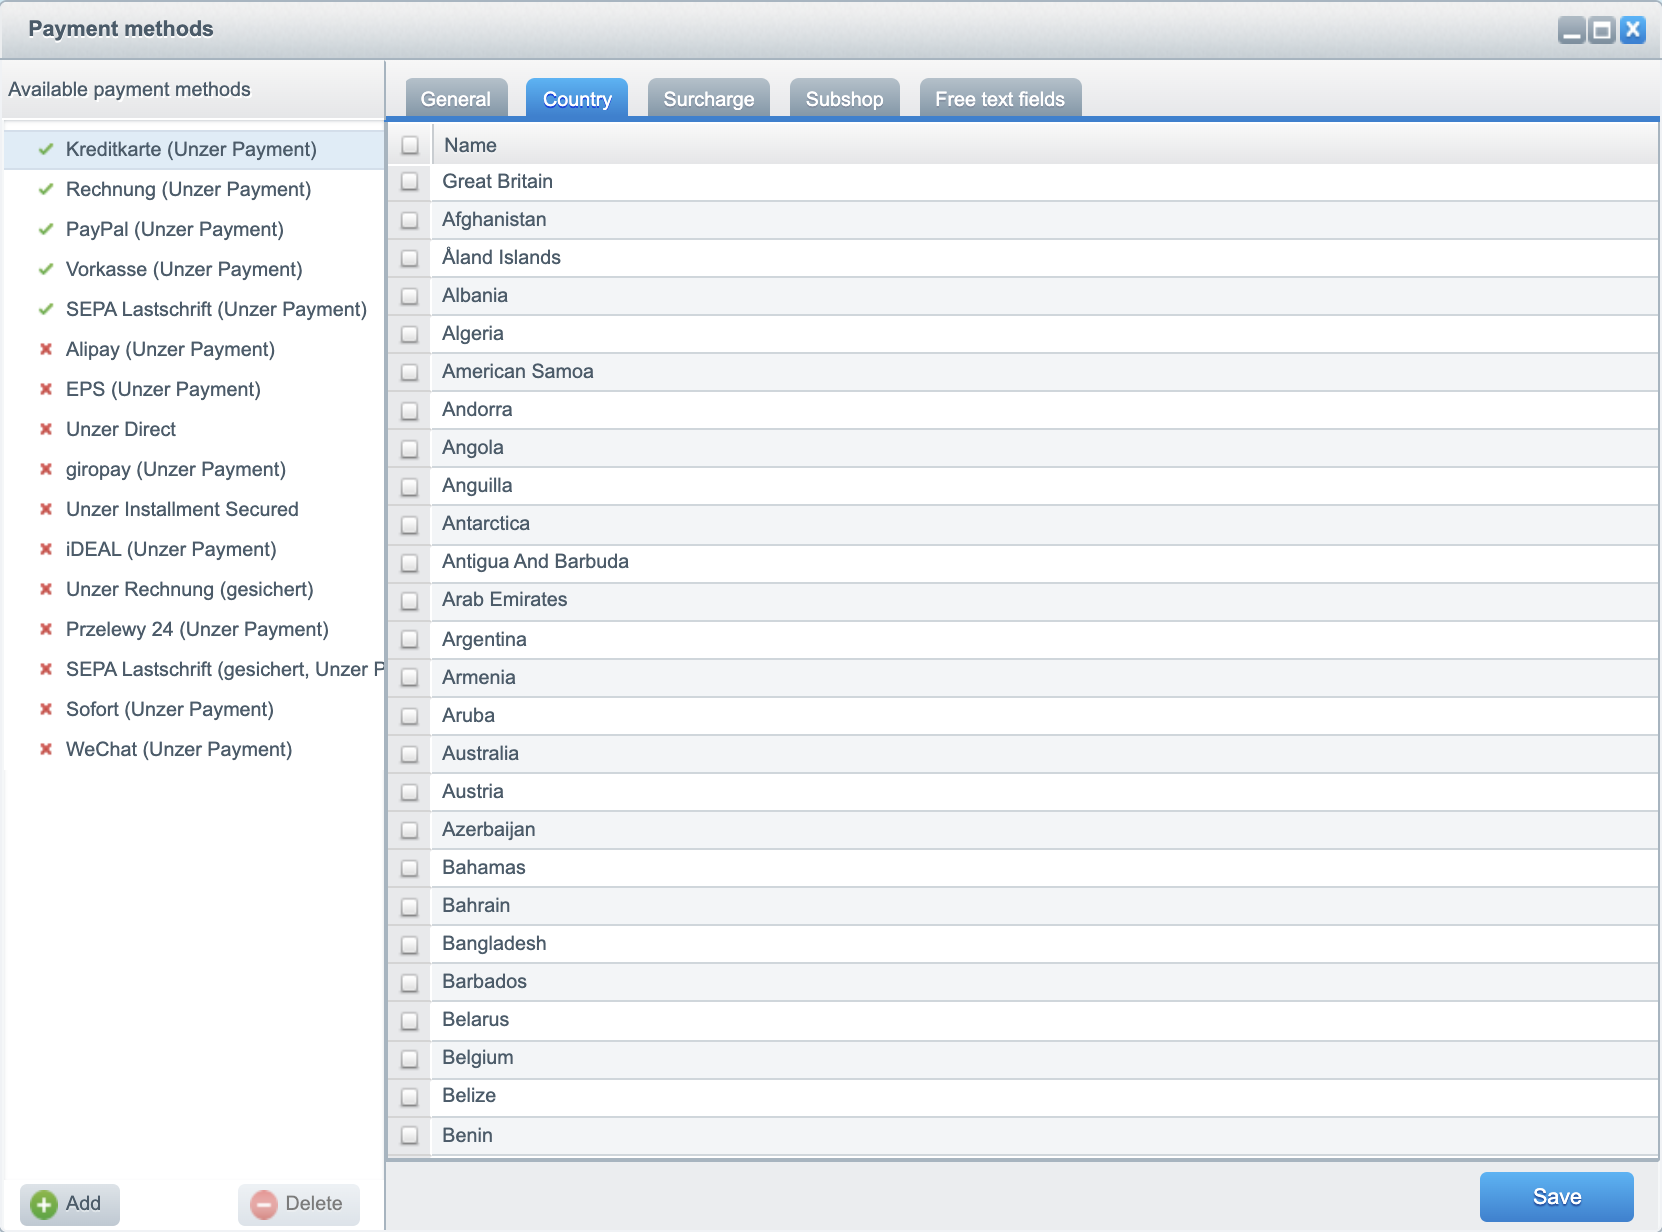 Select the countries for which the payment method should be available. If you do not select any of the countries, the payment method is available for all the supported countries.
 - (Optional) Select Surcharge to specify the details.
Surcharge is available only for some countries. - (Optional) Select the Subshop for which the payment method shall be available. If you leave it empty, the payment methods for all subshops (optional / conditional) are available.
- (Optional) Select Free text fields that are mostly used by third party plugins or ERP systems.
Contact the manufacturer of the specific plugin for the free text field details.
Step 2: Set up your payment methods for shipping costs
- Sign in with your admin credentials and go to Configuration > Shipping costs to add the Shipping cost management details.

- Click Edit (pencil icon) to update the specific shipping method.
- Go to the Payment methods tab and drag all the payment methods to the Allowed section.
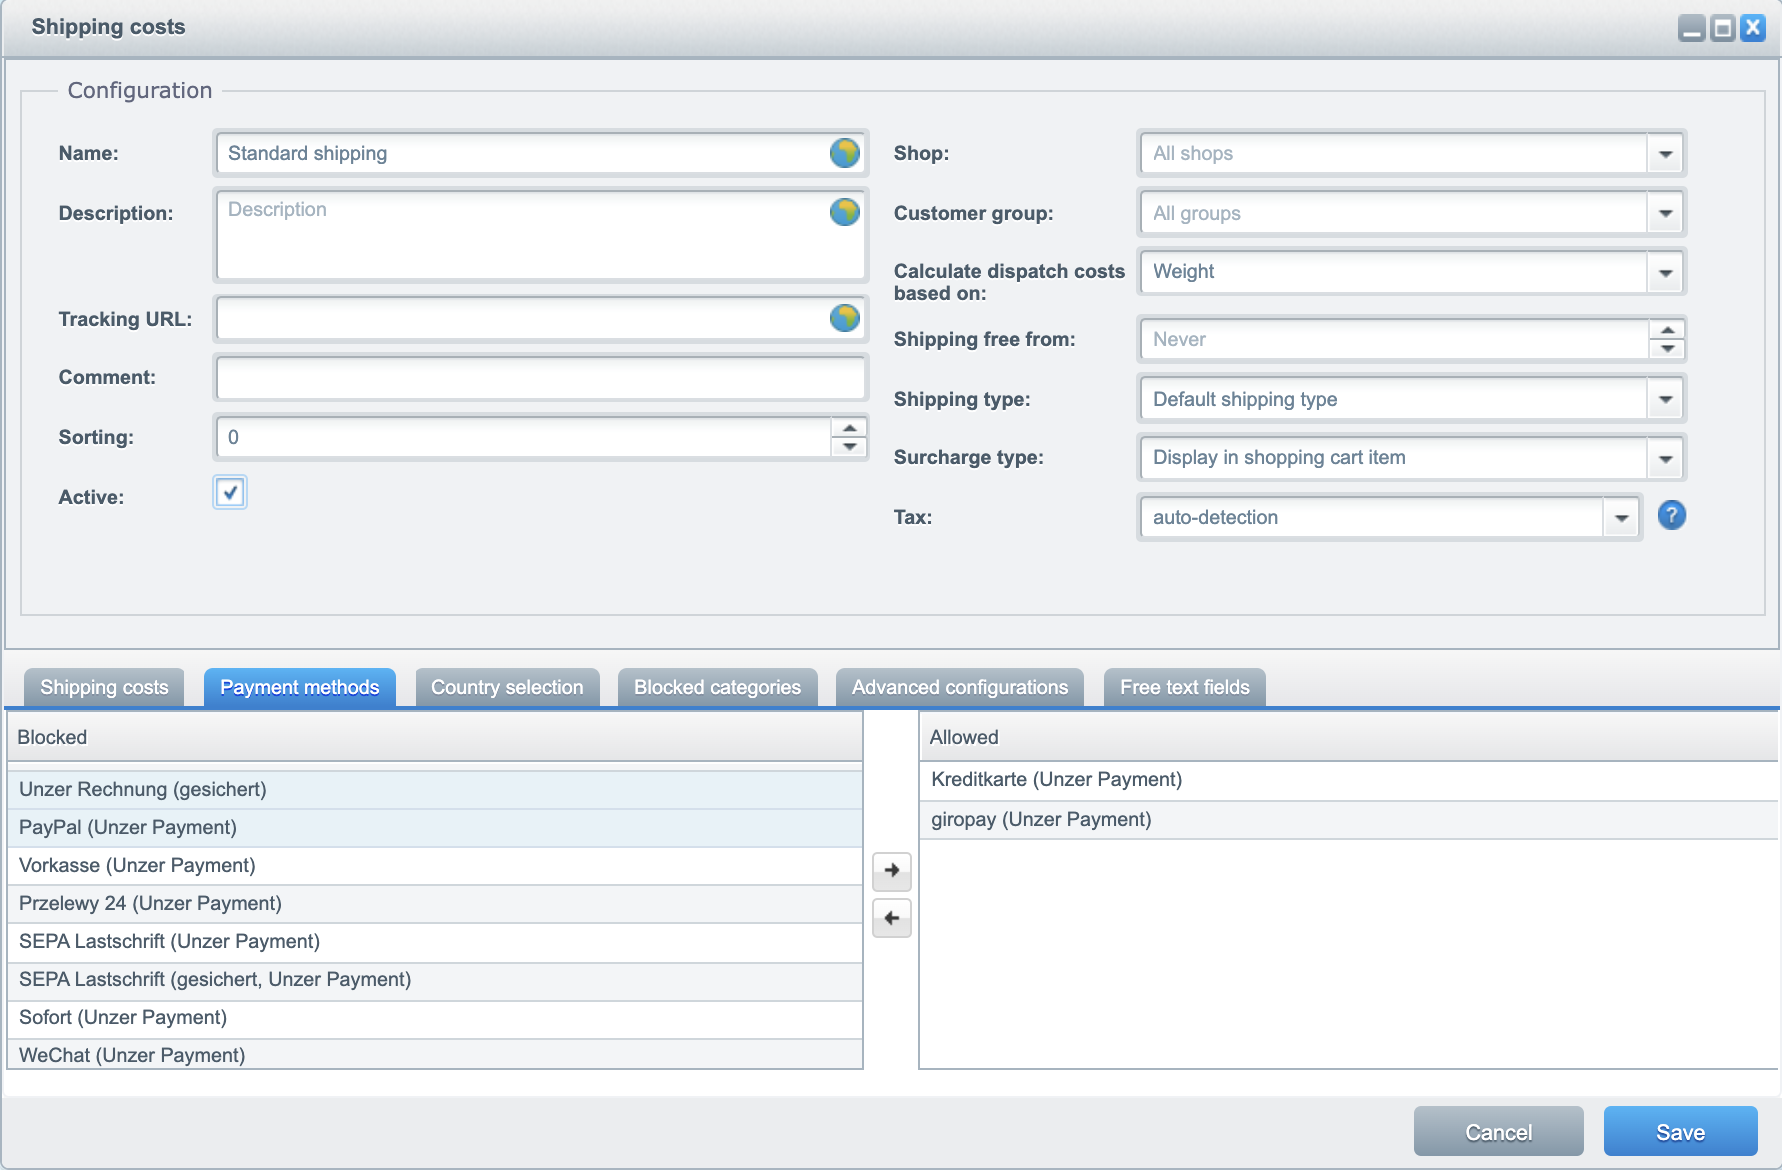
- Click Save.
Step 3: Specify payment method requirements
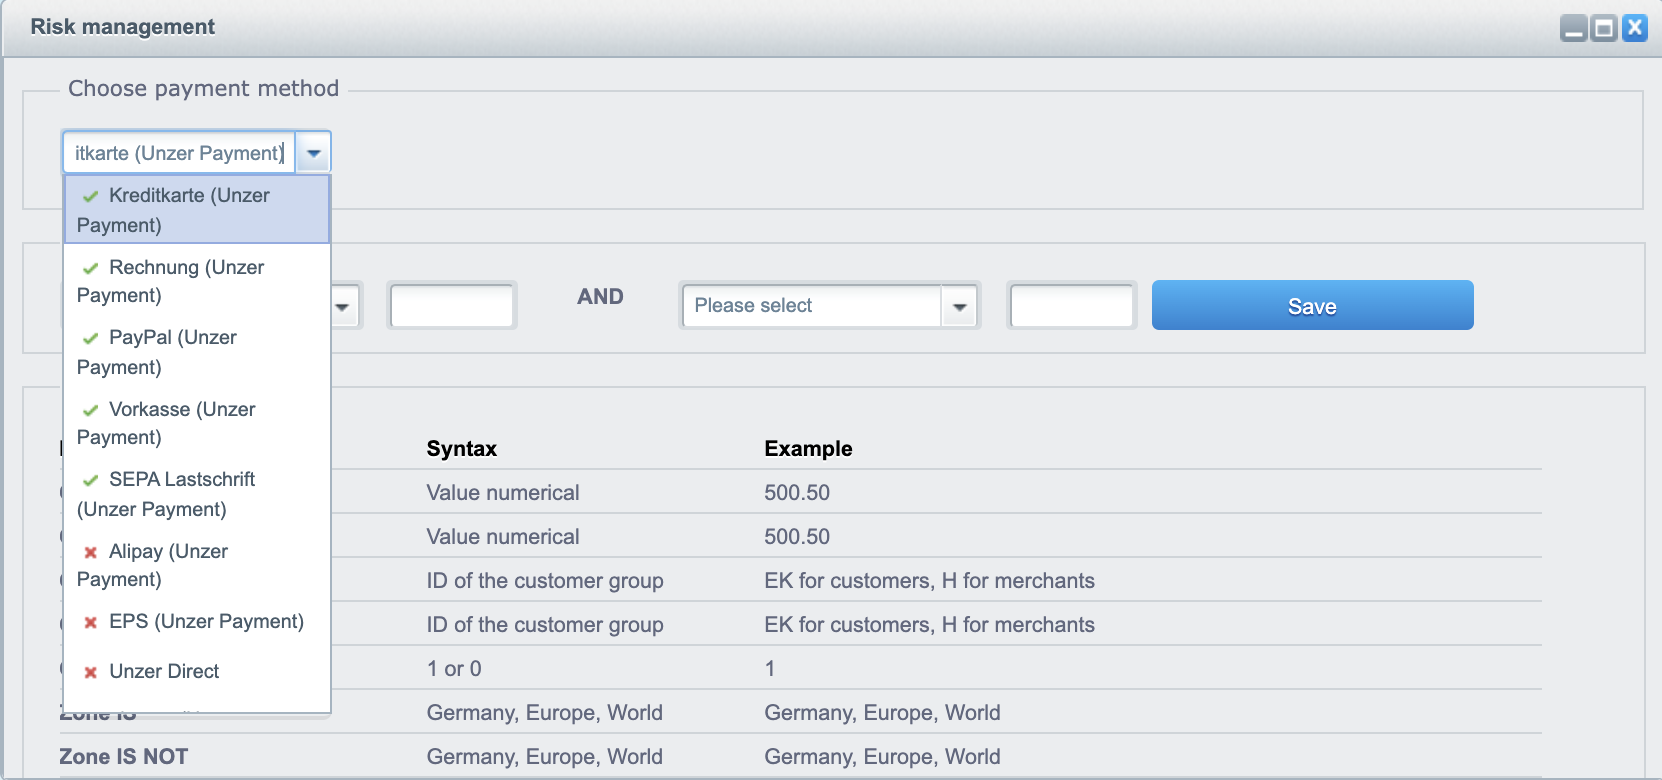
Some payment methods are only available in specific countries and currencies. You can create specific rules for these using the Shopware Risk Management. Choose the payment methods that you want to restrict and enter the rules according to these restrictions.
| Payment method | Requirement |
|---|---|
| Apple Pay |
|
| Google Pay | To learn more about the Google Pay integration, go to Google Pay: Overview. |
You must also set up the gatewayMerchantId for Google Pay. Go to Google Pay integration for more details. | |
| iDEAL (Unzer Payment) | For the payment method iDEAL (Unzer Payment), make sure that only end customers with a billing address from the Netherlands can use the payment method. |
| EPS (Unzer Payment) | For the payment method EPS (Unzer Payment), make sure that only end customers with a billing address in Austria can use this payment method. |
| Przelewy24 (Unzer Payment) | For the Przelewy24 (Unzer Payment) payment method, ensure that only
|
| SEPA Lastschrift (Unzer Payment) + SEPA Lastschrift (gesichert, Unzer Payment) | For the SEPA Direct Debit payment methods, ensure that only
|
| Unzer Rechnung (gesichert) | For the payment method Unzer Rechnung (gesichert), make sure that only
|
| Rechnung (Unzer Payment) | Depending on your agreed contract with Unzer
|
Set up Installment payment method
- For Installment payment method, ensure that only end customers with an invoice address from Germany, Austria, or Switzerland can use this payment method.
- You require a unique key pair for each customer type and currency combination, for example a separate key pair for each combination B2C (EUR), B2C (CHF)
- Currently, only B2C customer type is supported.
- Currently only Euro (EUR) and Swiss Franc (CHF) currencies are supported.
- Ensure that the payment method can only be used for the minimum and maximum amounts contractually agreed with Unzer.
- You can view the transactions in Unzer Insights.
Set up payment method
- Go to Basic settings > Payment methods > *UnzerPayment and go your shop settings.!Add key pair\
- Select the domain and then select Register Webhooks > Save.
- Repeat the same steps to add other combinations according to your business case.
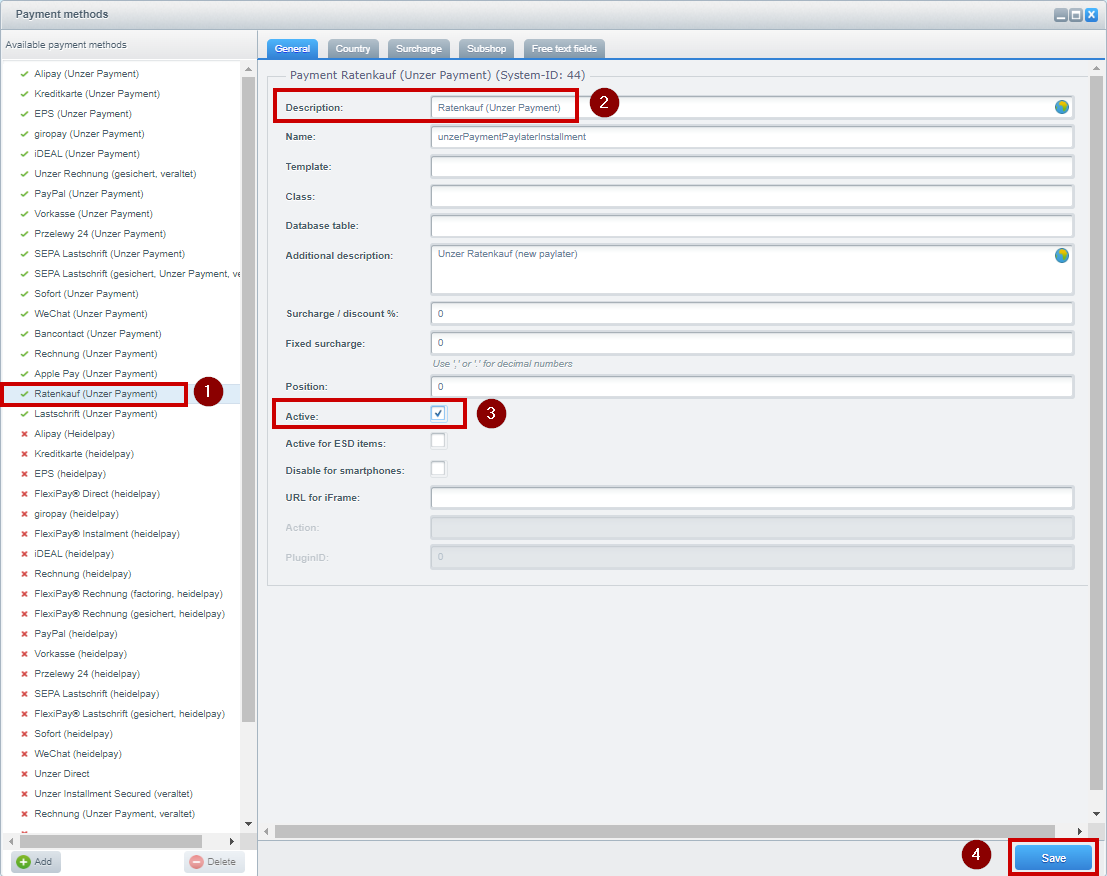
- Now, go to Configuration > Payment methods > Ratenkauf (Unzer Payment).
- Specify the name that you want to see in the shop front end.
- Select Active and then Save.
Set up Direct Debit (Secured) payment method
Set up SEPA Direct Debit payment method- For Direct Debit, ensure that only end customers with an invoice address from Germany and Austria can use this payment method.
- You require a unique key pair for this payment method, for example, a separate key pair for each combination B2C (EUR).
- Only B2C customer type is supported.
- Only Euro (EUR) is supported.
- Ensure that the payment method can only be used for the minimum and maximum amounts contractually agreed with Unzer.
- You can view the transactions in Unzer Insights.
- In the Shopware 5 shop back end, you must also set up the key pairs for the B2C currency combination.
Set up the payment method
- Go to Basic settings > Payment methods > UnzerPayment and go your shop settings.

- Select the domain and then select Register Webhooks > Save.
- Repeat the same steps to add other combinations according to your business case.
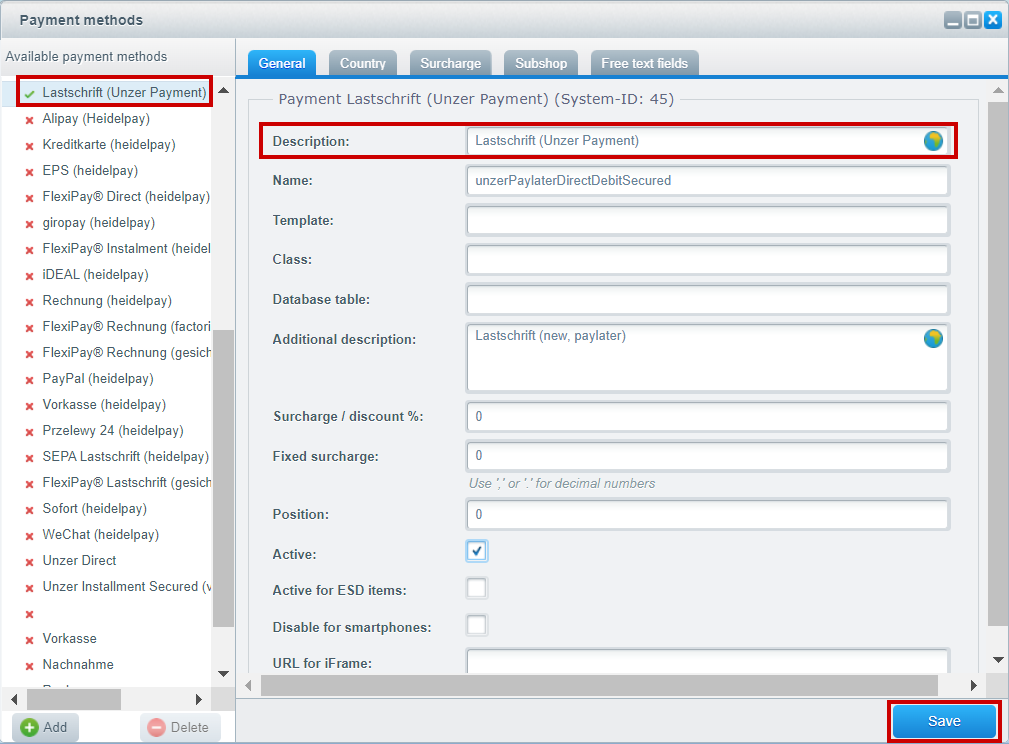
- Now, go to Configuration > Payment methods > Lastschrift (Unzer Payment).
- Specify the name that you want to see in the shop front end.
- Select Active and then Save.
Step 4: Register webhooks
After configuring the various key pairs, you must also register the webhooks and test your credentials.
- Go to Configuration > Basic settings > Payment methods > UnzerPayment and select Register webhooks.
- Select Save.
- (Optional) Select Test API credentials to test your credentials.
Step 5: Clear the caches
After finishing the configuration, you must clear the cache of your shop.
- Go to Configuration > Cache/Performance > Cache/Performance and then select Cache.
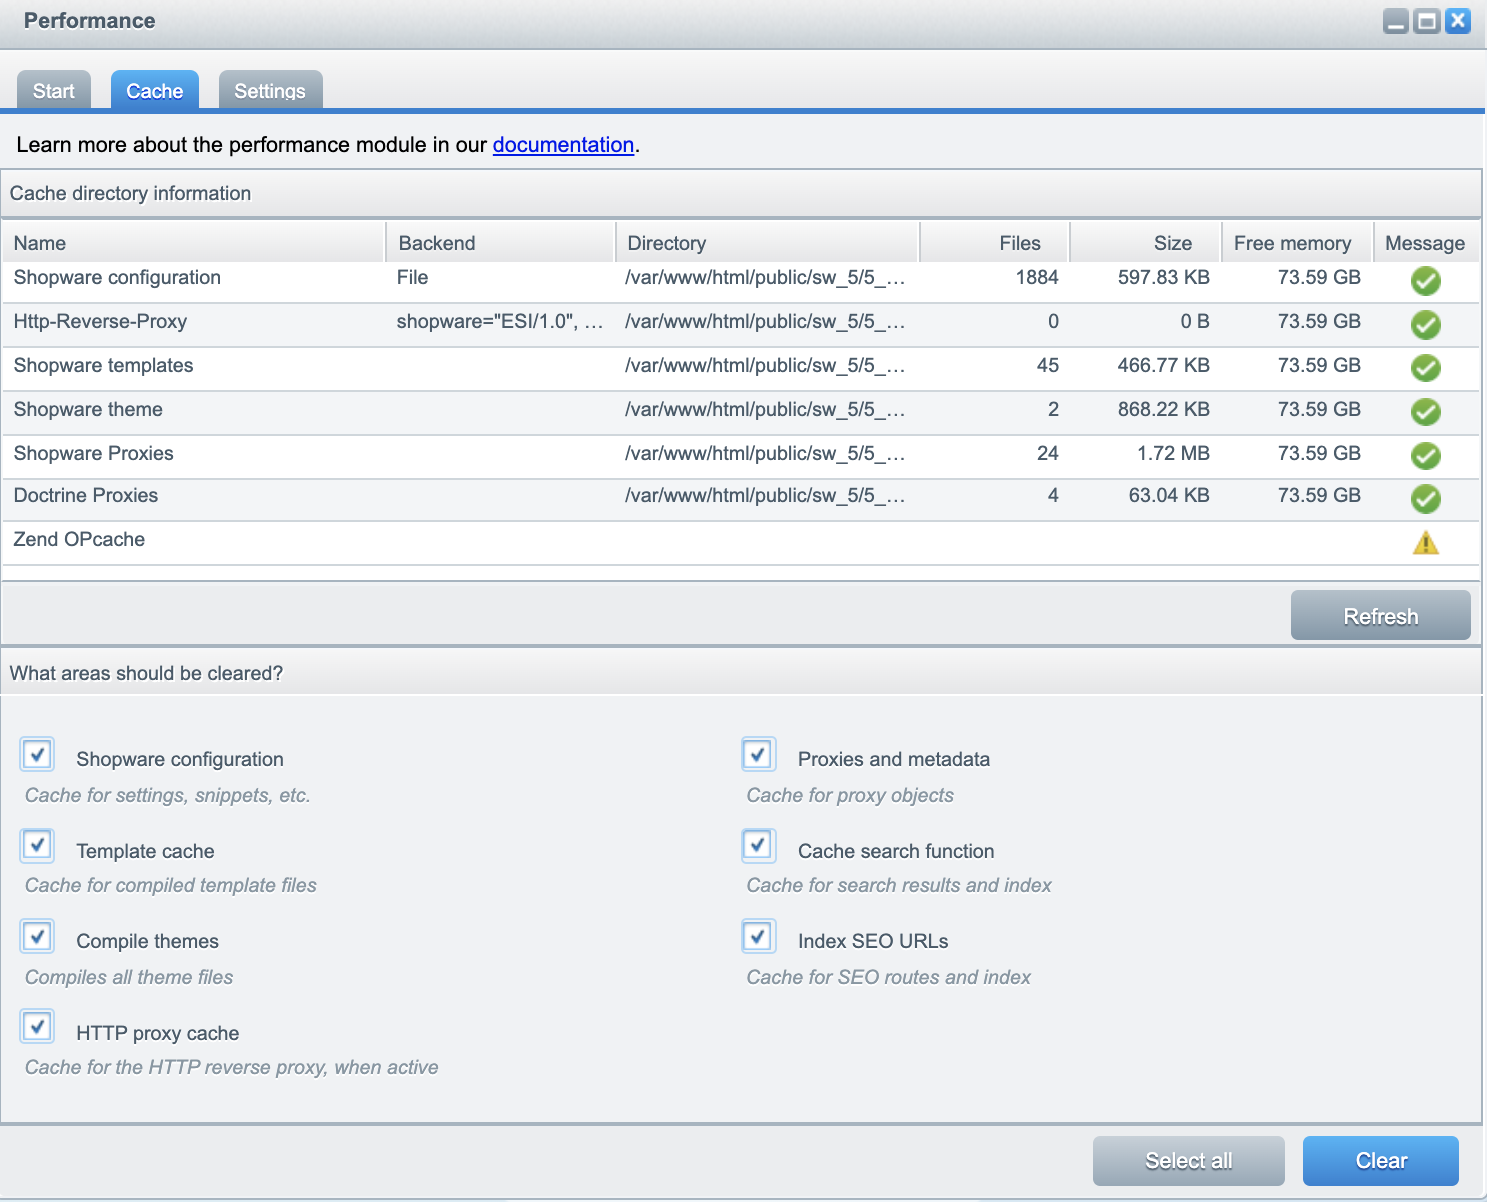
- Select all to mark all cache areas
- Clear to clear all the shop caches
Next steps
Learn how to handle transactions Manage transactions
