Set up your payment methods
Set up the payment methods that you want to offer to your customers.
To accept payments, you have to configure the payment methods, which you’ve contractually agreed to with Unzer.
Before you begin
Configure payment methods
Individual Payment Method Settings
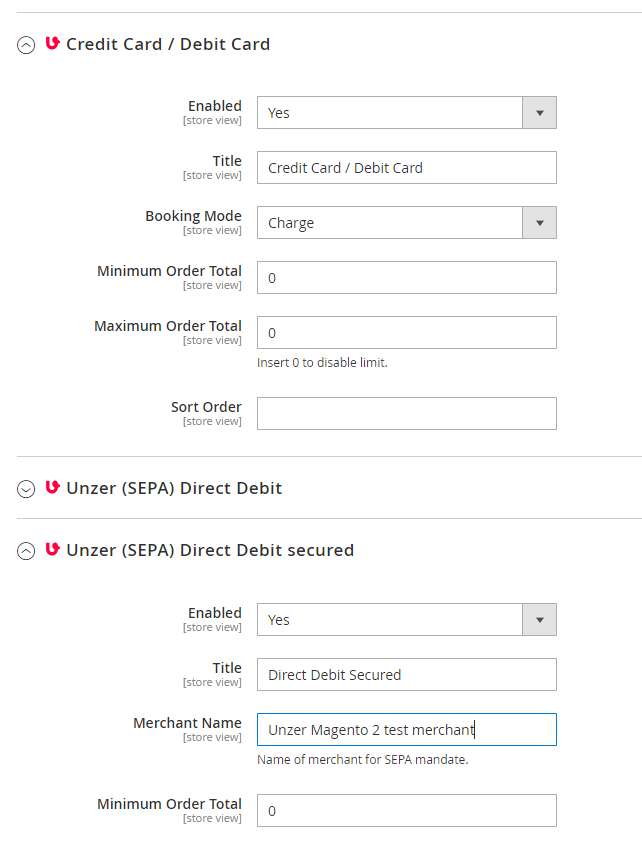
Now you can configure the individual payment methods. Expand the payment method that you want to configure. The options available vary for each payment method. For example, for card payment method, it can contain the following details.
| Field name | Description |
|---|---|
| Enabled | Set this to Yes to offer it to your customers at the time of checkout. This activates the respective payment method in the store. |
| Title | Enter the name of the payment method as it is displayed in the store and in emails. For multiple Store Views with different languages, you can use this field to translate the payment type names. The default value will be automatically translated to German if the store uses a German locale. And translation files can be used to change/add translations. |
| Booking Mode | Configure the booking mode for the payment methods Credit cards, Debit Cards, and PayPal. Available modes are: Debit (Direct Charge) The order amount is charged immediately. Authorize The order amount is reserved at first and captured later when the invoice is created. |
| Sort Order | Enter the order in which payment methods are displayed in the store. |
| Minimum Order Total | Enter the amount that your customers order for the payment method if the order total is in this range. To deactivate a limit, set 0 value. |
| Maximum Order Total | Enter the maximum amount that your customers can select the payment method if the order total is in this range. To deactivate a limit, set 0 value. |
| Merchant Name | This determines the merchant name displayed in the direct debit mandate for the respective payment method. |
Set up one-click payments for cards and PayPal payment methods
You can set up instant one-click payments for card and PayPal payments for registered customers. The customer can choose to save the payment method for the next purchase. They can also log in to the customer back end and delete them if they want to delete these tokens later.
Set up one-click payments for card payments
- In the admin back end, go to STORES > Configuration > SALES > Payment Methods, and go to Credit Card / Debit Card.
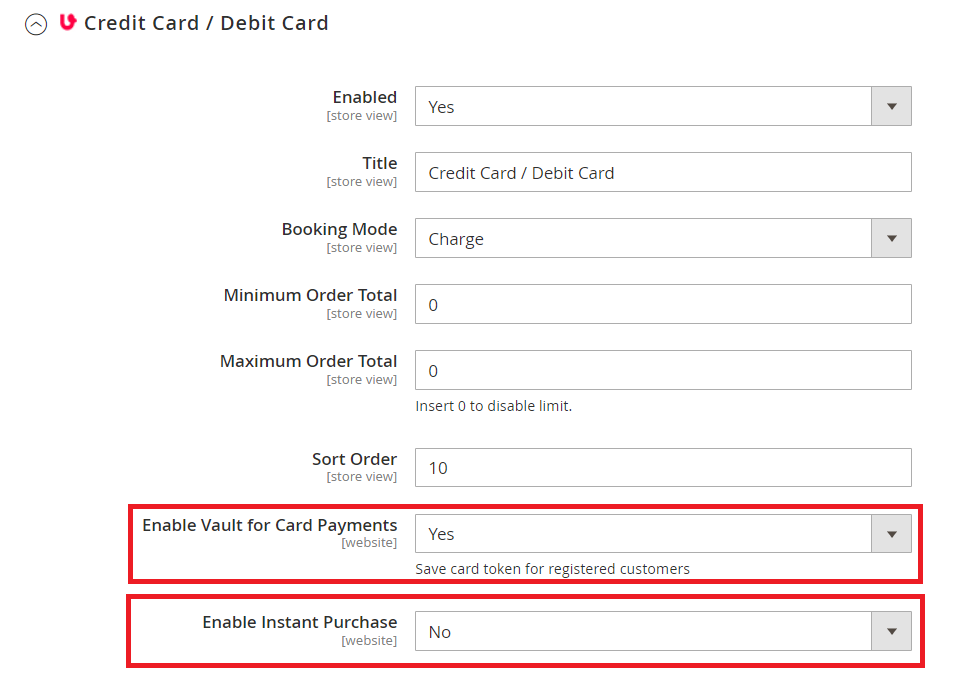
- In the Enable Vault for Card Payments, select Yes.
- (Optional) If you want to the Instant Purchase button for the registered customers, select Yes.
- Select Save Config.
Set up one-click payments for PayPal payments
- In the admin back end, go to STORES > Configuration > SALES > Payment Methods, and go to PayPal.
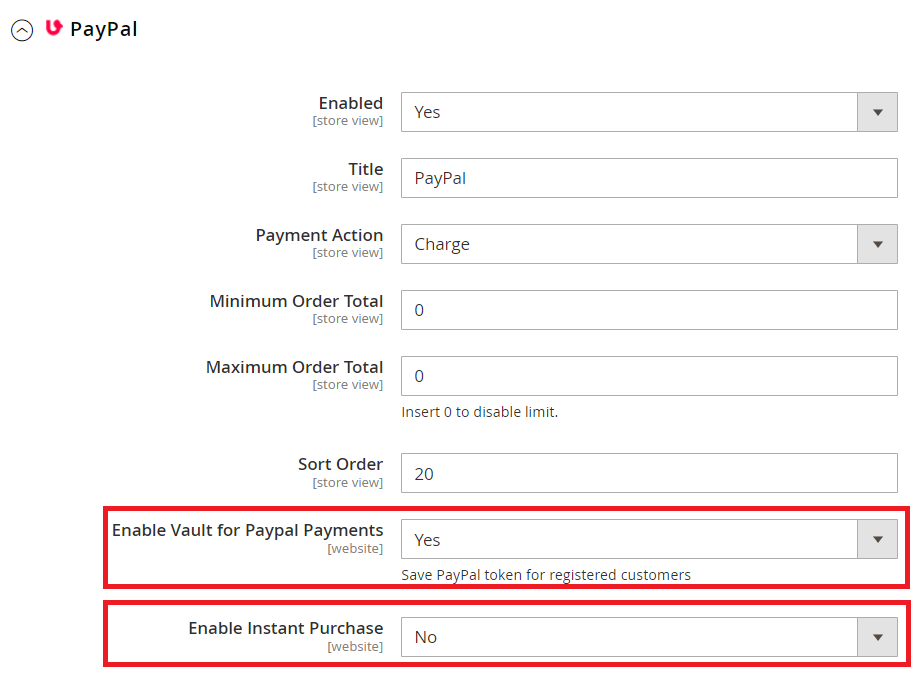
- In the Enable Vault for Card Payments, select Yes.
- (Optional) If you want to the Instant Purchase button for the registered customers, select Yes.
- Select Save Config.
When the registered customer selects, the Save my credentials for the next purchase, they don’t need to enter their details and the saved token is selected for the next purchase. For example, if they select the card that was previously used for the purchase, they can do the 3D Secure check and make the payment.
If the customer wants to delete the saved credentials, they can log in to their account and delete the same.
Set up Invoice payment method
- For Invoice, ensure that only end customers with an invoice address from Germany, Austria, or Switzerland can use this payment method.
- You require a unique key pair for each customer type and currency combination, for example a separate key pair for each combination B2C (CHF), B2C (EUR), B2B (CHF), and B2B (EUR).
- Currently only Euro (EUR) and Swiss Franc (CHF) currencies are supported.
- Ensure that the payment method can only be used for the minimum and maximum amounts contractually agreed with Unzer.
- You can view the transactions in Unzer Insights.
- You must generate an invoice in the Magento 2 back end before you can charge the payment. This ensures that the insurance period is initiated.
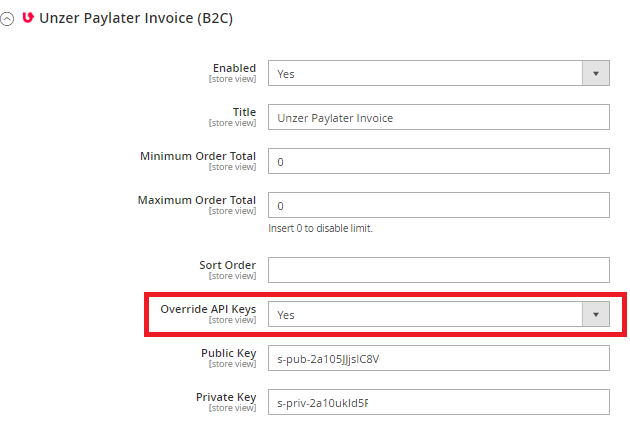
- In the Magento 2 shop back end, you must also set up the key pairs for the B2B and B2C currency combination. Go to Stores > Configuration > Sales > Payment methods.
| Field name | Description |
|---|---|
| Override API keys | This field is only available for Unzer Paylater Invoice (B2B) and Invoice (B2C). Select Yes to enable the key pairs specific for Paylater Invoice. This is required from a technical point of view so that the correct payment method is available, and the correct payment flow is used for the transaction. |
| Public Key | This field is only available for payment methods that require additional key pairs. Enter the public key that is available in Unzer Insights. |
| Private Key | This field is only available for payment methods that require additional key pairs. Enter the private key that is available in Unzer Insights. |
- Select Save Config.
Set up Installment payment method
- For Installment payment method, ensure that only end customers with an invoice address from Germany, Austria, or Switzerland can use this payment method.
- You require a unique key pair for each customer type and currency combination, for example a separate key pair for each combination B2C (CHF), B2C (EUR).
- Currently, only B2C customer type is supported.
- Currently only Euro (EUR) and Swiss Franc (CHF) currencies are supported.
- Ensure that the payment method can only be used for the minimum and maximum amounts contractually agreed with Unzer.
- You can view the transactions in Unzer Insights.
- You must generate an invoice in the Magento 2 back end before you can charge the payment. This ensures that the insurance period is initiated.
- In the Magento 2 shop back end, you must also set up the key pairs for the B2C currency combination.
Set up the payment method
- Go to Stores > Configuration > Sales > Payment methods and scroll down to Installment.
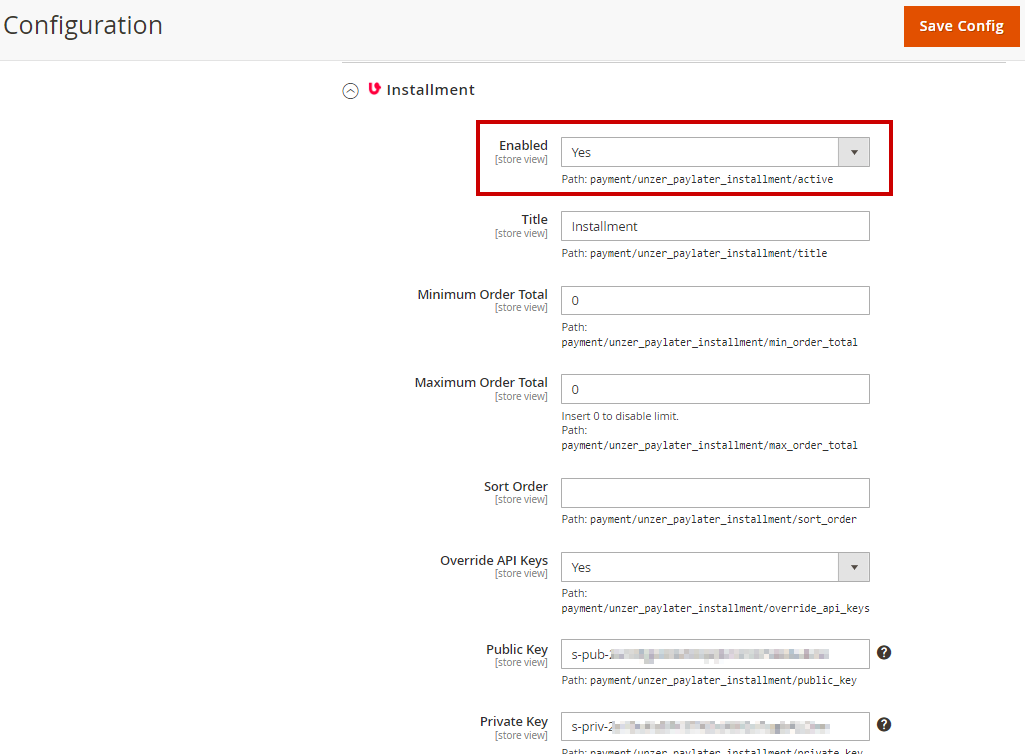
- Select Enabled as Yes.
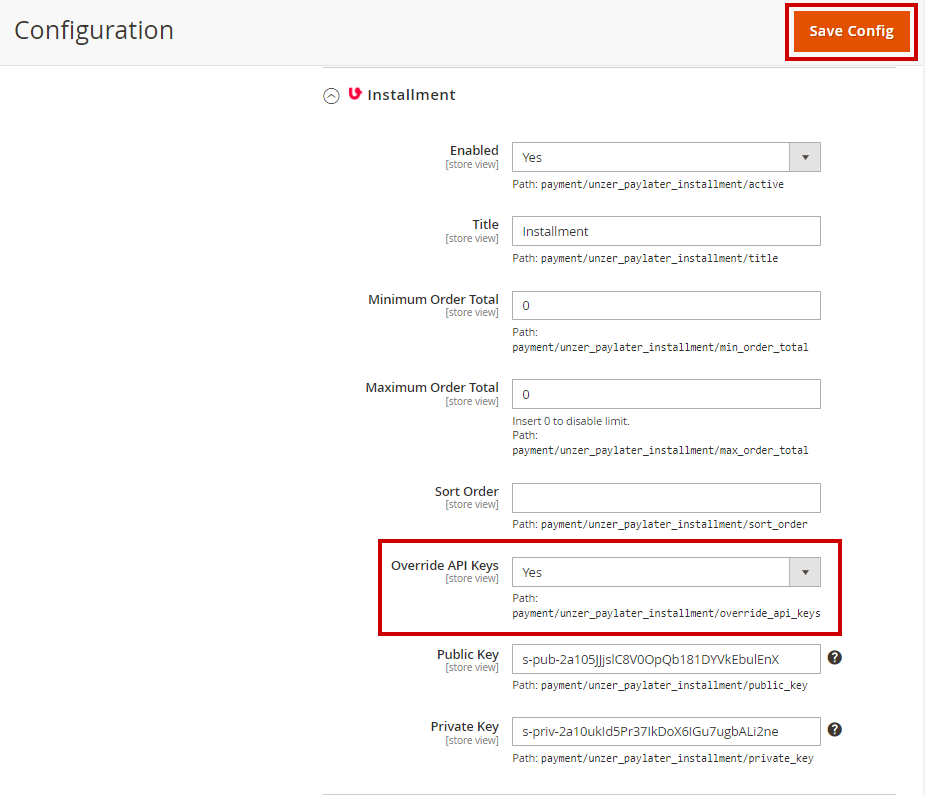
- Enter the key pair, select Override API Keys as Yes, and then select Save Config
| Field name | Description |
|---|---|
| Override API keys | This field is only available for payment methods that require additional key pairs. Select Yes to enable the key pairs specific for Installment payment method. This is required from a technical point of view so that the correct payment method is available, and the correct payment flow is used for the transaction. |
| Public Key | This field is only available for payment methods that require additional key pairs. Enter the public key that is available in Unzer Insights. |
| Private Key | This field is only available for payment methods that require additional key pairs. Enter the private key that is available in Unzer Insights. |
Set up SEPA Direct Debit payment method
Set up SEPA Direct Debit payment method- For Direct Debit, ensure that only end customers with an invoice address from Germany and Austria can use this payment method.
- You require a unique key pair for this payment method, for example, a separate key pair for each combination B2C (EUR).
- Only B2C customer type is supported.
- Only Euro (EUR) is supported.
- Ensure that the payment method can only be used for the minimum and maximum amounts contractually agreed with Unzer.
- You can view the transactions in Unzer Insights.
- You must generate an invoice in the Magento 2 back end before you can charge the payment. This ensures that the insurance period is initiated.
- In the Magento 2 shop back end, you must also set up the key pairs for the B2C currency combination.
Set up the payment method
- Go to Stores > Configuration > Sales > Payment methods and scroll down to SEPA Direct Debit.
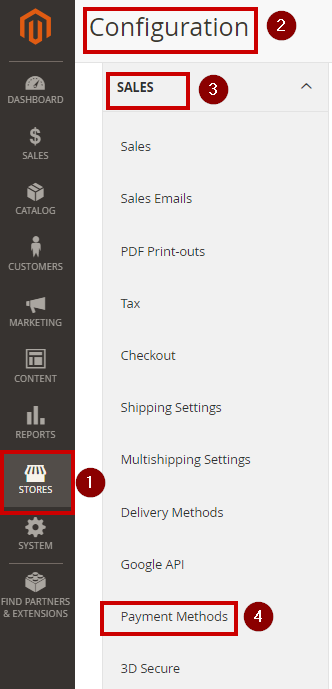
- Specify the payment method details.
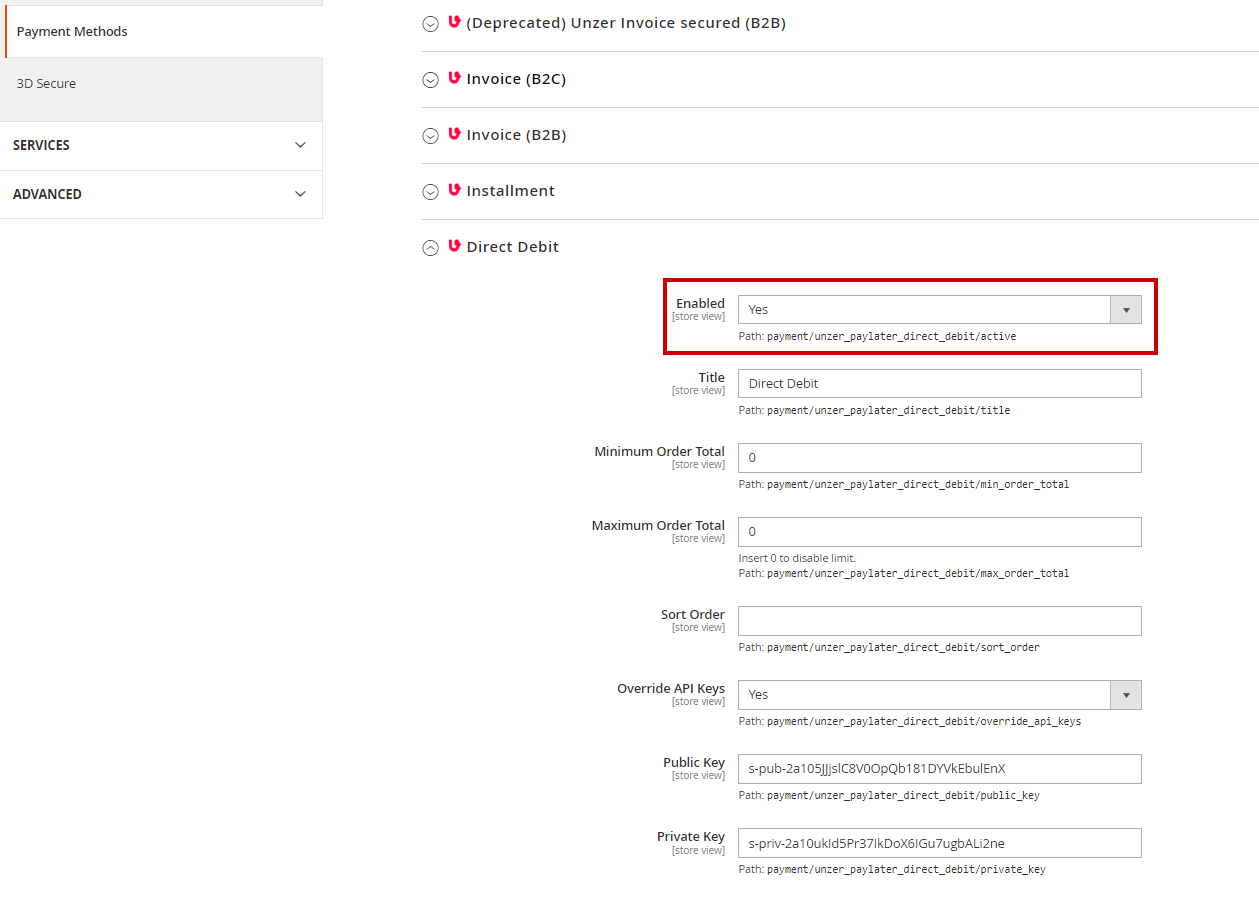
- Select Enabled as Yes.
- Enter the key pair, select Override API Keys as Yes, and then select Save Config.
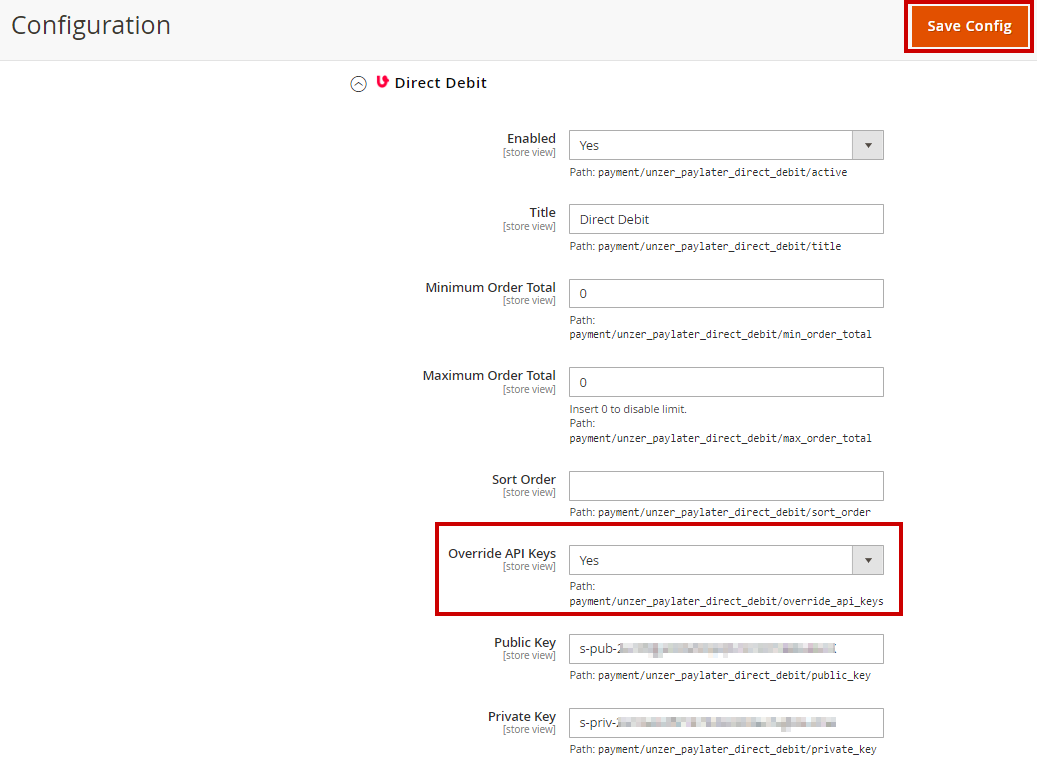
| Field name | Description |
|---|---|
| Override API keys | This field is only available for payment methods that require additional key pairs. Select Yes to enable the key pairs specific for Direct Debit. This is required from a technical point of view so that the correct payment method is available, and the correct payment flow is used for the transaction. |
| Public Key | This field is only available for payment methods that require additional key pairs. Enter the public key that is available in Unzer Insights. |
| Private Key | This field is only available for payment methods that require additional key pairs. Enter the private key that is available in Unzer Insights. |
Set up Apple Pay payment method
Apple Pay integration
Before you begin integrating Apple Pay payment method, please read the Apple Pay prerequisites for integration.
- Go to Stores > Configuration > Sales > Payment methods and select Apple Pay.
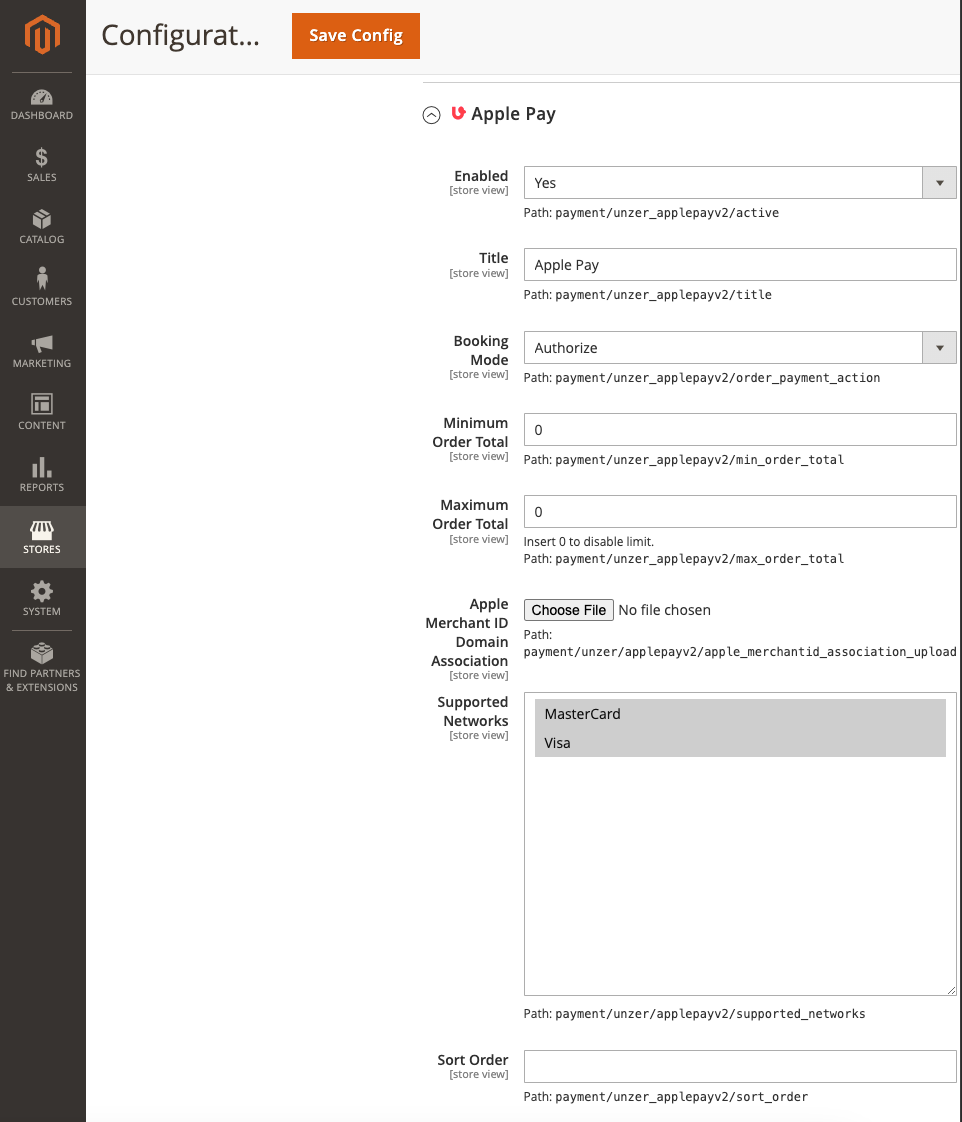
- Select Enable and specify the Title that you want to display in the shop front end.
- Select the Booking Mode.
- Upload the Apple Merchant ID Domain Association file.
- (Optional) Select the Supported Networks.
- Select Save Cofig.
Set up the Google pay payment method
Go to Stores > Configuration > Sales > Payment methods > Unzer > Google Pay.
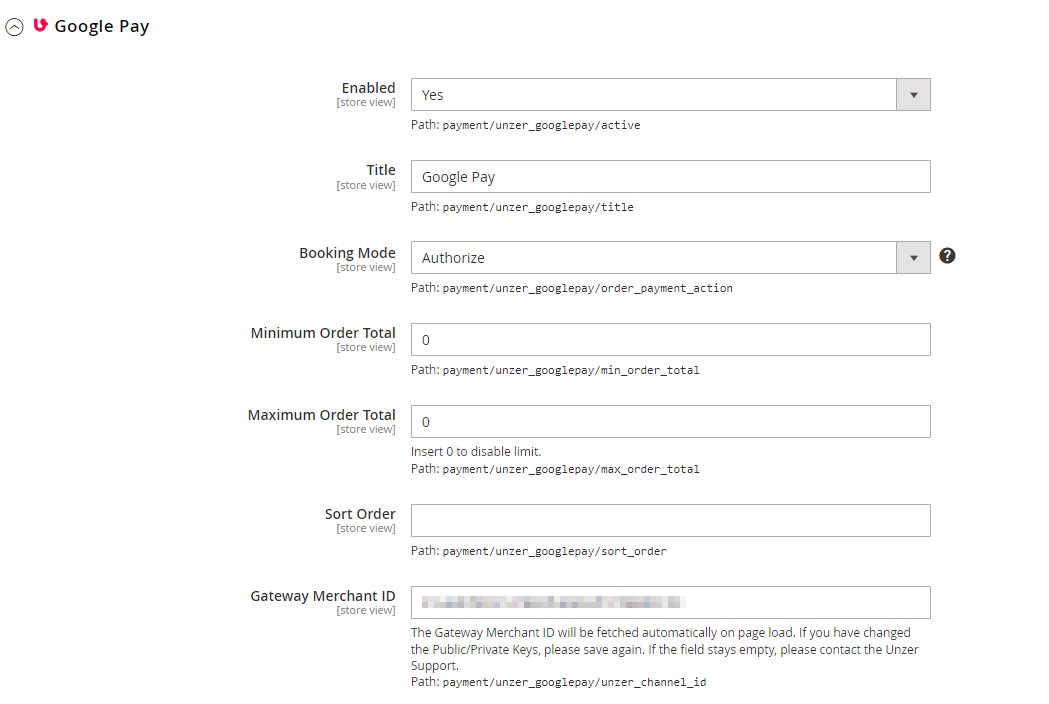
If you update the key pairs, remember to click Fetch Gateway Merchant ID.
Specify the payment method details.
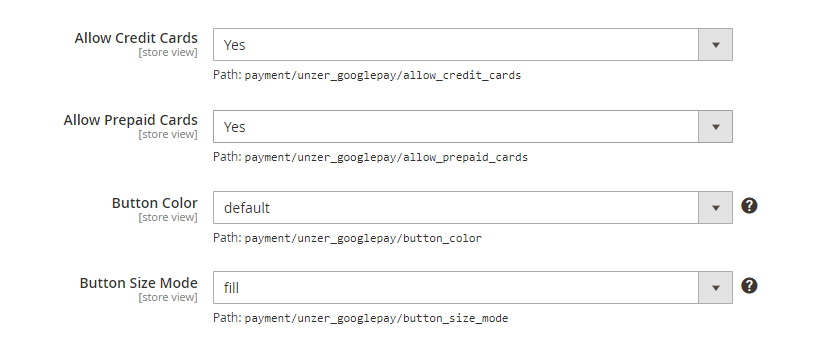
Select Save Config.
To learn more about the Google Pay integration, go to Google Pay: Overview.
You must also set up the gatewayMerchantId for Google Pay. Go to Google Pay integration for more details.
